Samsung Galaxy A16 - Tips, Tricks & Hidden Features
We just have to think 14 moves ahead, that's all. Welcome to whatGear reviews. If you've just picked up a Galaxy A16 5G, you probably know this is definitely not a flagship phone, but that doesn't mean that you can't optimize this phone with some of the flagship features that Samsung's One UI has to offer. So get ready, because I'm going to show you how to turn this budget phone into a beast.
The Power Of The Key
So this is how your phone is going to look when you first boot it up and log in for the first time. And by the end of this video, it's going to be completely different and far more to my eyes and tailored for how you want to use it. So let's start with one of the first things that I always do with all Samsung phones.
Jump into your settings. So if you swipe down, you'll see the settings icon up here. Tap that, scroll down to Advanced Features and here go to side button. So right now if you double push the side button which is also the fingerprint reader twice it will launch the camera. But a far better way to use this in my opinion, is to open your wallet of choice.
So if you go to open app, it brings up all of the apps available on your phone. So you could literally set this to anything. But I always set it up as the Google Wallet. Now double push on the power key when I need to pay for something immediately brings up the Google Wallet, and you can set this up as the Samsung Wallet if that's what you're using. And this is such a great tip because it saves so much time at the checkout if they have contactless payments.
Optimize the Space
So this is quite a big display. And the default set up here is for icons across the bottom and only five vertical. My personal thoughts on this is you might as well make the most of the big display. And the best way to do this is this hold your finger down an empty part of the screen and at the bottom.
If you go to settings here, you can change the home screen grid to five by six. Now you have more space per screen for more apps, and you can also add an extra icon on the dock.So I'm just going to add Chrome because that's something I use all at the time. There we go.
Custom Wallpapers
Tip number three is probably one of the first things that most people do with any new phone, and that is to customize the wallpaper. You can of course use preset ones or photos if you want, but if you want some advice on how to find a really good wallpaper, a good app to use is Pinterest.
And this next one is a photo that I found there. So to customize the wallpaper, just hold your finger down on an empty screen. You'll see wallpaper and style here. If you go to this, you'll see the option to change wallpaper. Now you can choose any of the presets, but if you do have a photo in your gallery you want to use, just tap on the gallery, select it and hit done and you'll see straight away applies it to both the lockscreen and the home screen.
You can untick one of these if you want to have different images on the home screen and lock screen. Now that that's selected, you can add some more customization to this wallpaper. So you could add a frame if you want to, and that will just cut part of the, picture out. And then you can move the picture around inside that frame and you can change the color of the frame as well if you want.There's also the option to add effects to the wallpaper. So if you swipe across it will change the color filter on that wallpaper. I'm not going to go with this hot one. I'm just going to go with the regular full screen wallpaper at this point.
Custom Icons
So one of the cool things you can do with Samsung software is actually customize how the icons look.So check this out. Hold your finger down on an empty part of the screen. Go to Wallpaper Install again and then you'll see this section here color palette. So if you go to this you can enable it. And what it will do is try and match the icons in the UI to the colors of the wallpaper that you've chosen.
And then if you don't like the set up, you can of course choose different color profiles and some really nice ones here. And if you want to keep it really basic, you can go to the basic colors and choose something more simple. Now this next step applies it to the app icons, and it's this little switch here at the bottom.If you go to Apply Palette to App icons, hit apply. It will work its magic. Now when we go back to the home screen, you'll notice all of the app icons are less distracting now. And I do think this is a good thing, especially when it comes to social media apps.
Custom Lock Screen
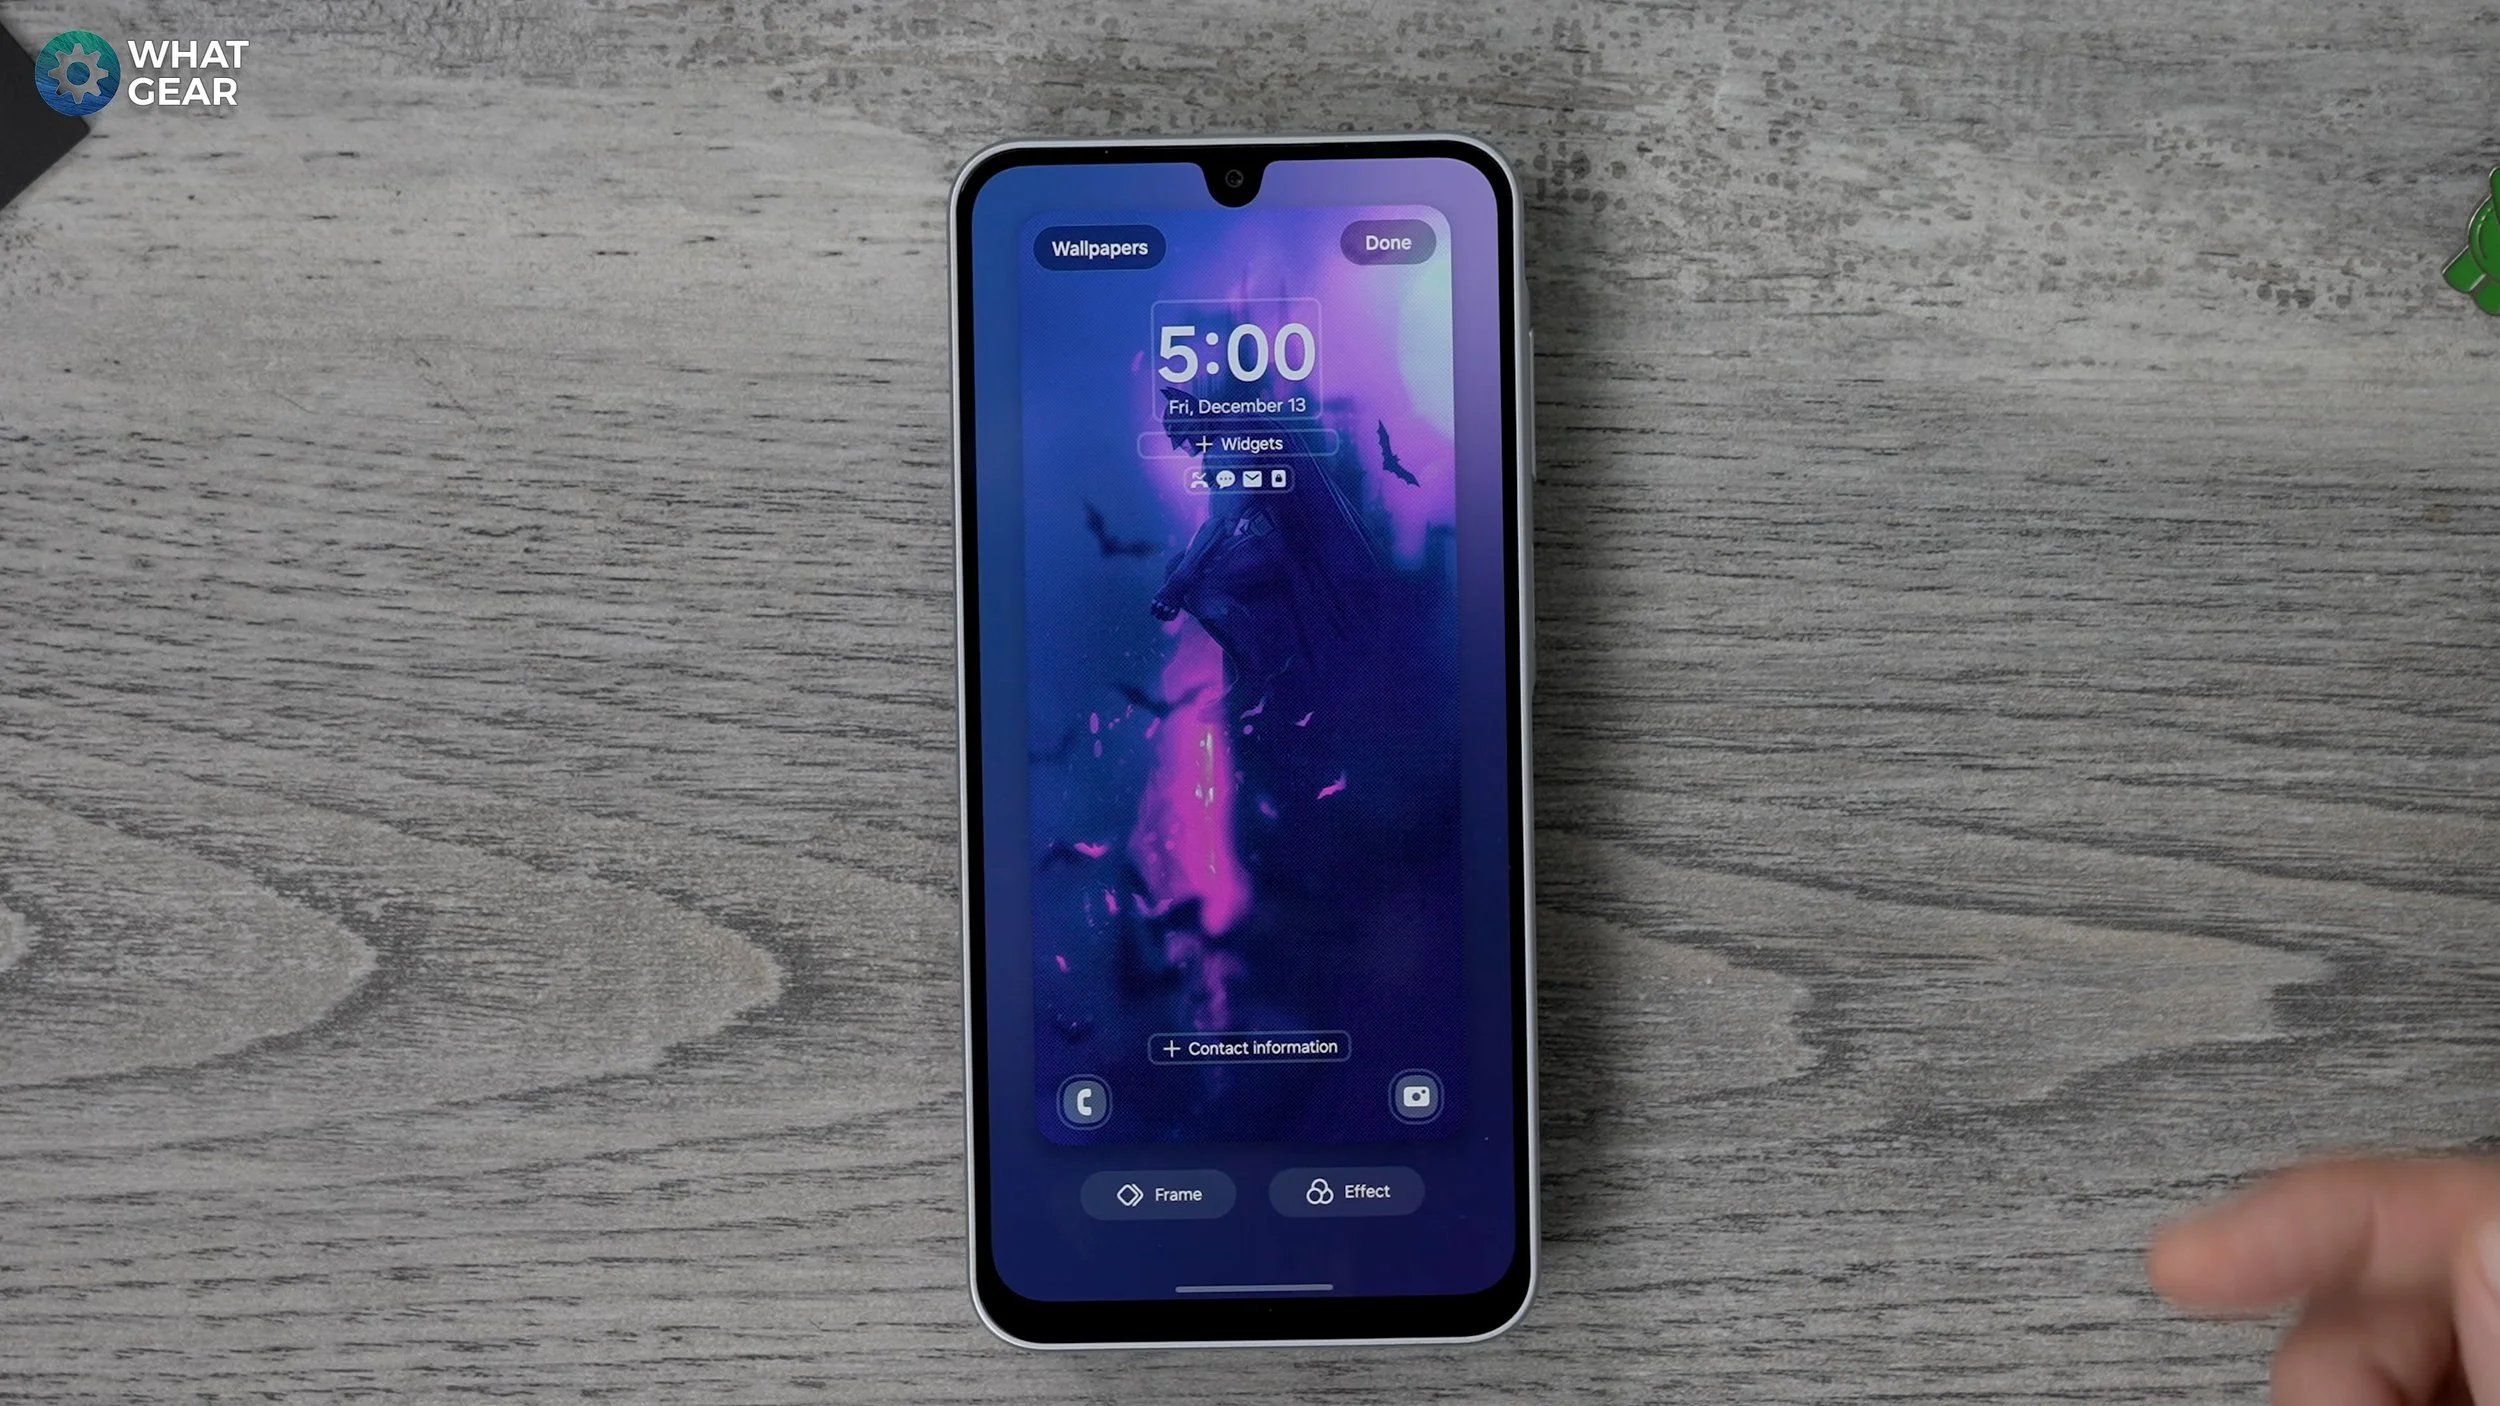
So the next thing I recommend you do is customize the lock screen, because the lock screen is surprisingly powerful. To do this, just hold your finger down on an empty space. Again, go to Wallpaper and Style. This time we're just going to tap on the lockscreen here and everything is highlighted on this page can be customized.
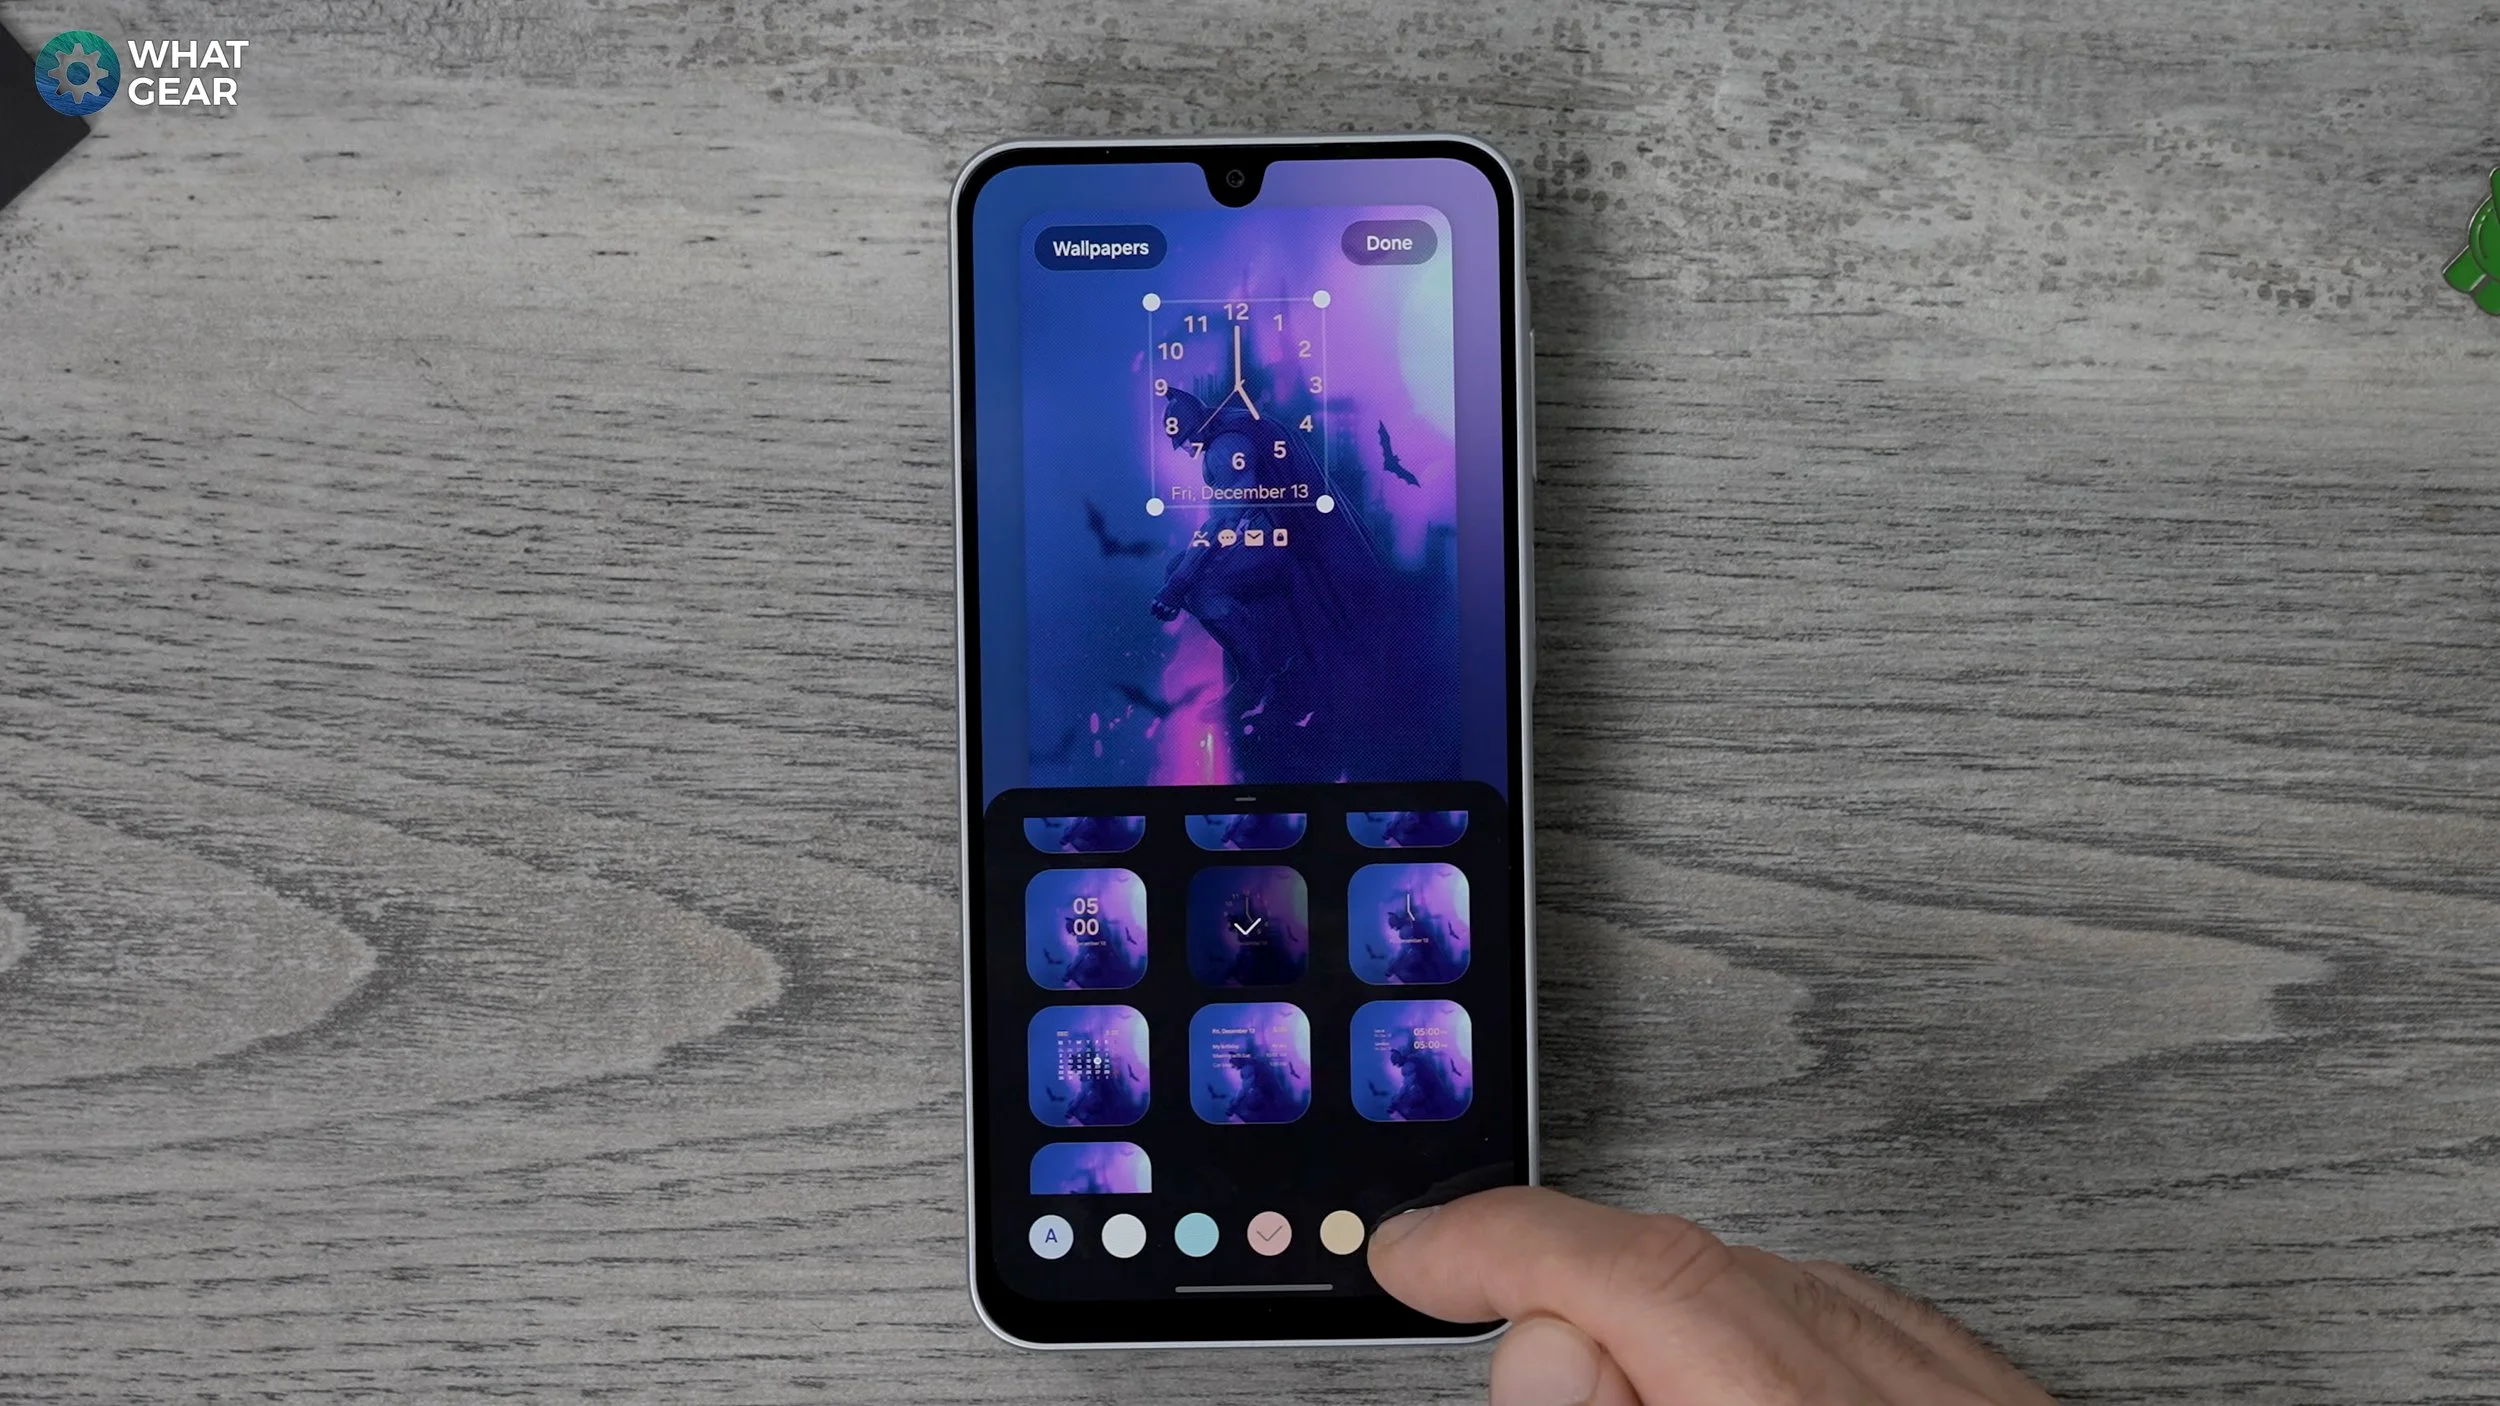
So for example, let's say we want to change this clock to a different style. You can do that. You can also change the color that the clock appears in.
Just make sure it stands out against the background that you're using. And then if you want to, you can move it around on the screen. So it works well with your wallpaper. And if you drag any of these four points on the corners, you can actually resize the clock to a slightly bigger one, or even a slightly smaller one entirely up to you.
Then you've also got the option to change the font of the numbers. So just play around with this and make sure it looks good with your wallpaper. Now once that's done, you can hit done. We can jump back into that lock screen again because there's more stuff to customize here. So notice this little section underneath the clock. You've got widgets.
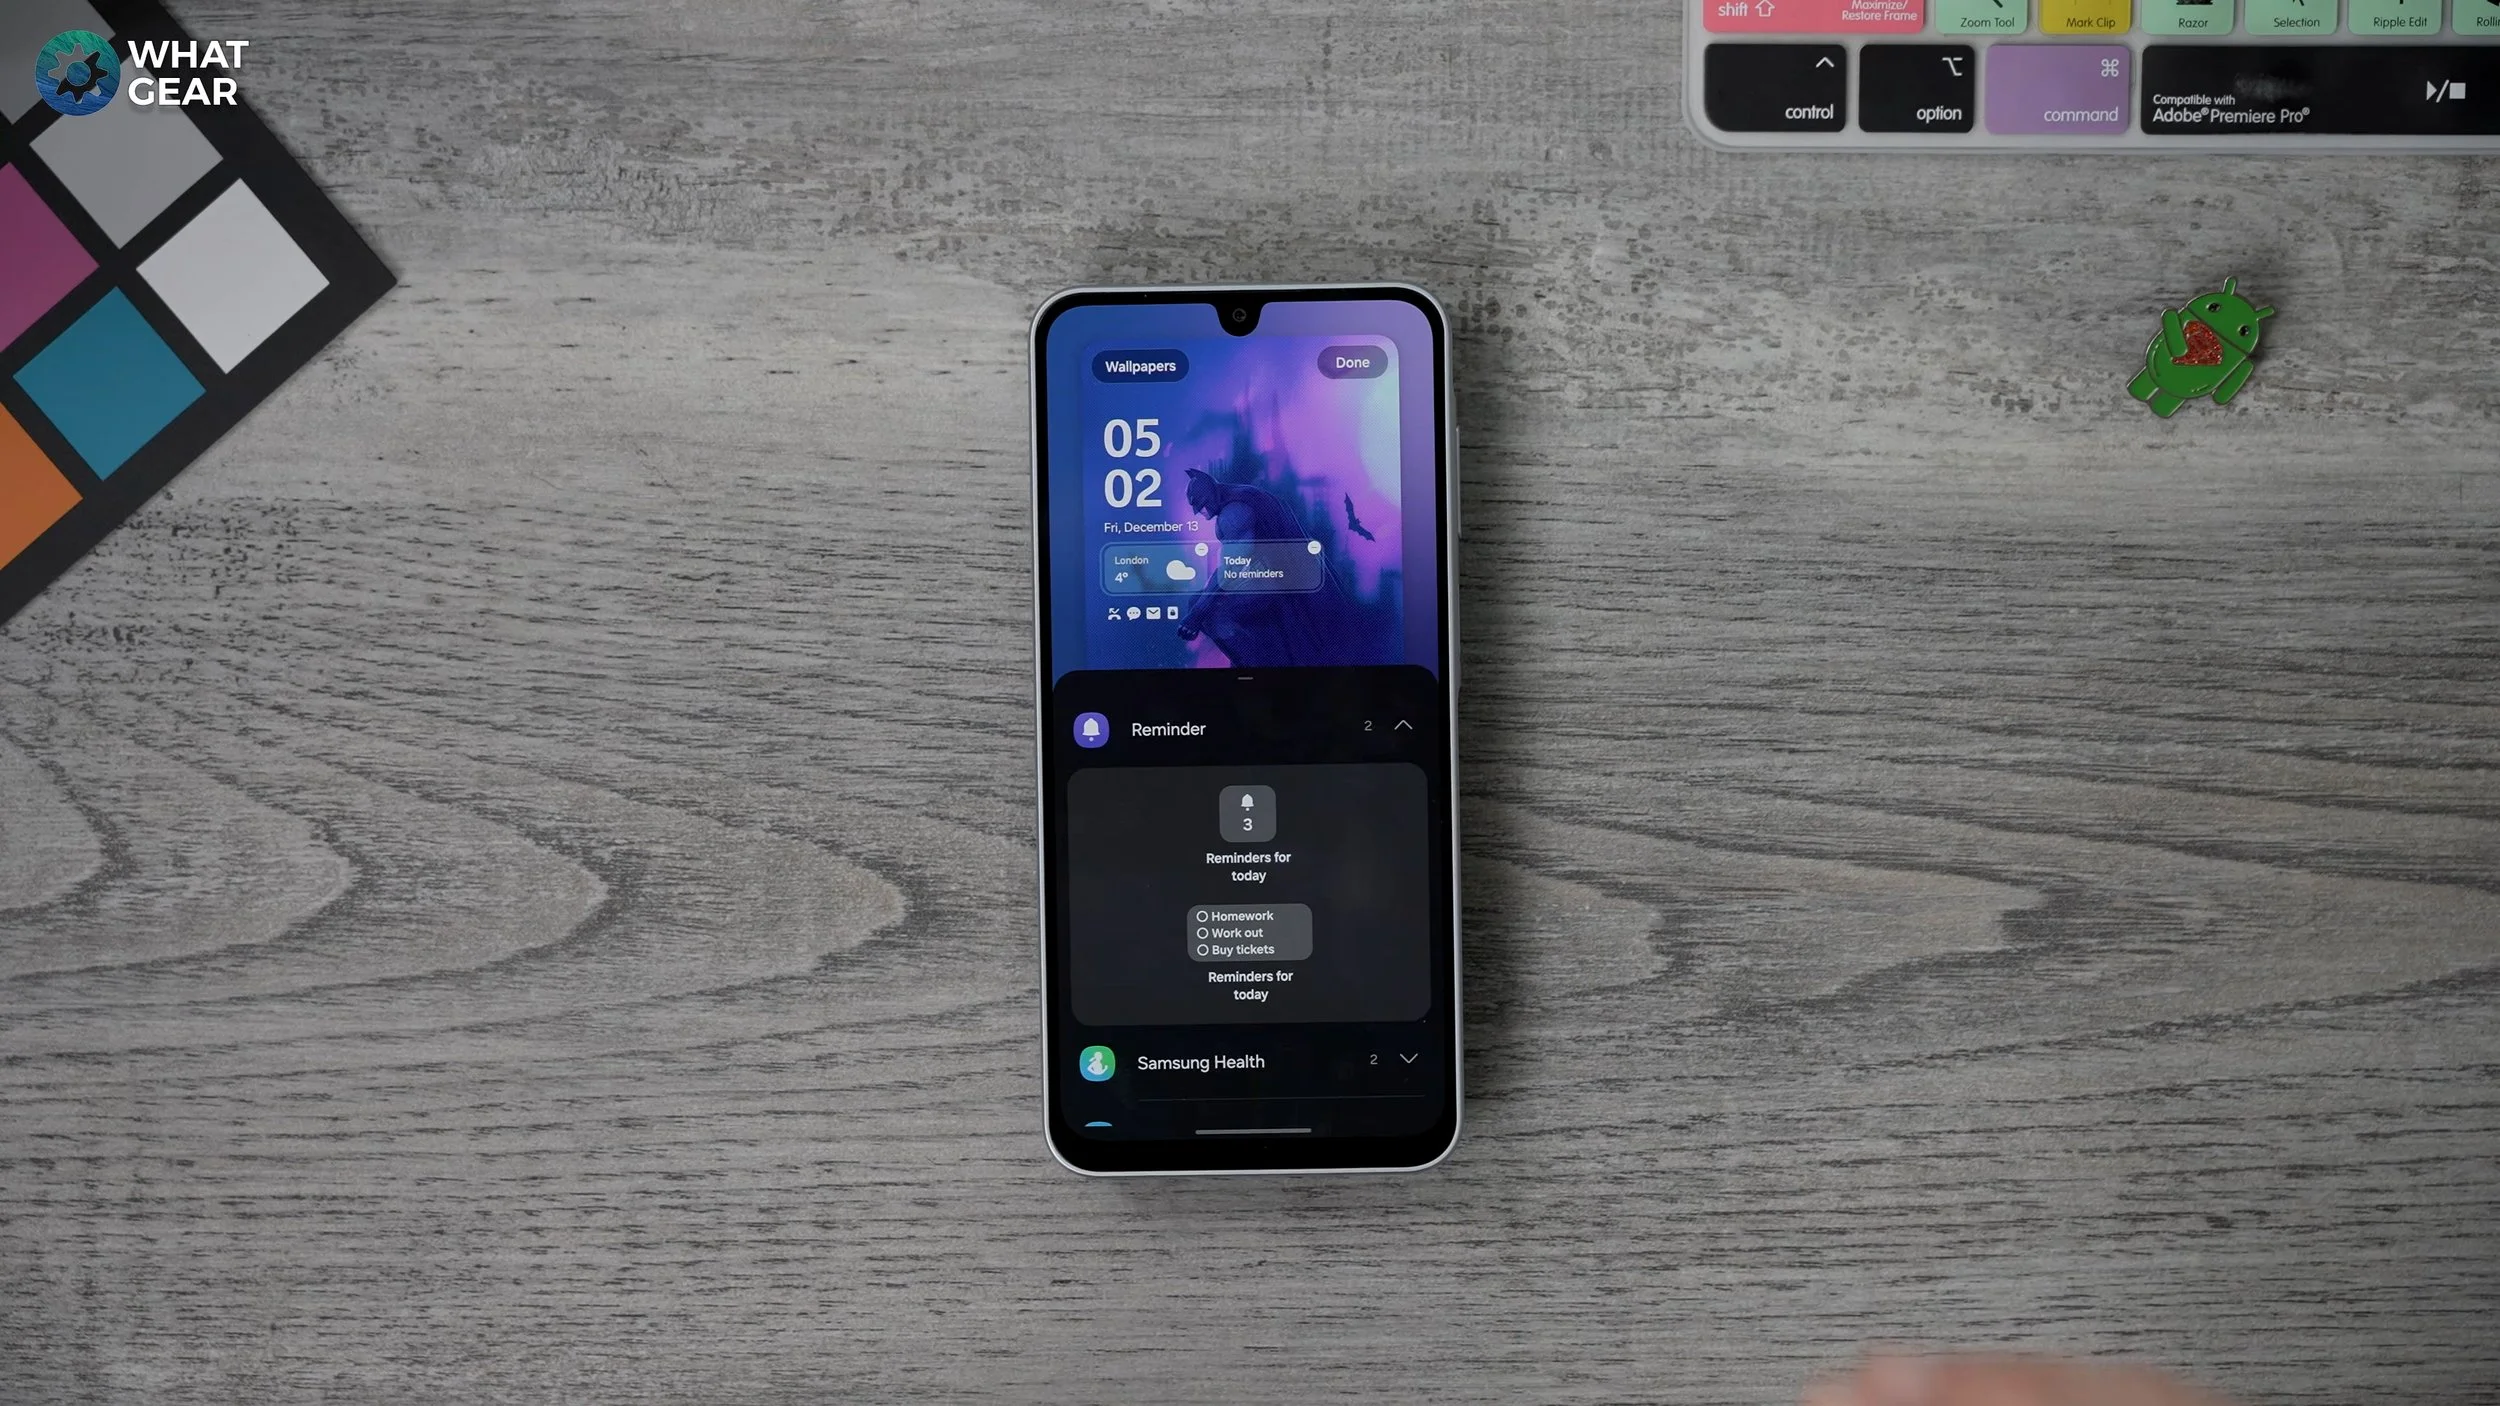
None of these are applied by default. If you hit widget you can actually add some shortcuts to your lock screen that will jump into certain things. So for example, if you want to add your weather widget, you can do that. And there's a bunch of different ones to choose from. If you're going to be using Samsung's reminders, you can actually have that on your lock screen as well.
There is limited space here, so if you use the smaller ones, you can actually have more than just two widgets. You could actually have four small widgets if you prefer. The next thing to customize on the lock screen is the notification area. Here you can actually change the style of how this pops up. So this is kind of the minimal icon only approach.
If you want to have more details on your lock screen, choose the detail section. I do think this is better, and the great thing about this is you can actually change the opacity of that, as well as if you want it to kind of stand out a bit more, change the opacity of that.
And the last thing that I highly recommend you do is add some contact information. So this will be super useful. If you lose your phone, you could put a friend's phone number in there, or an email address where someone can email you if they find your phone. And the last thing to do is actually reposition your wallpaper so it works better with how you set up this lock screen.
Good Times
So the next thing to do is actually set up a good clock for your home screen. And this is something that people will ask me about all the time. And actually setting this up will unlock another feature, which I'm going to show you later on in this video. So this is the standard set up here. You have your time up here and this kind of weather widget as standard.
We're going to get rid of this weather widget. And I'm going to go into the Google Play Store here. I'm going to search for Google Clock. This is Google's own official clock app. Just install that and set it up.
Once that's done, you've now unlocked a widget that you can use for this particular clocks. If you hold your finger down on an empty point screen at the bottom, you'll see the widget section.
Go to this. Scroll down till you see the Google Clock, which is the blue one here, and the one that I like the most is definitely this one. The analog and the scallop style. Just going to drag that over to the main home screen.
There we go. You don't have to use this particular one. You can use one of Samsung's ones or one of the other styles. But I do think it's a good thing to have a clock on the screen. And this one also shows the date as well.
Protect Your Eyes
So people don't realize this, but the amount of blue light that comes over your phone can actually disrupt your sleeping patterns. And this is why I recommend you do this. So if you jump into your settings, go to display.
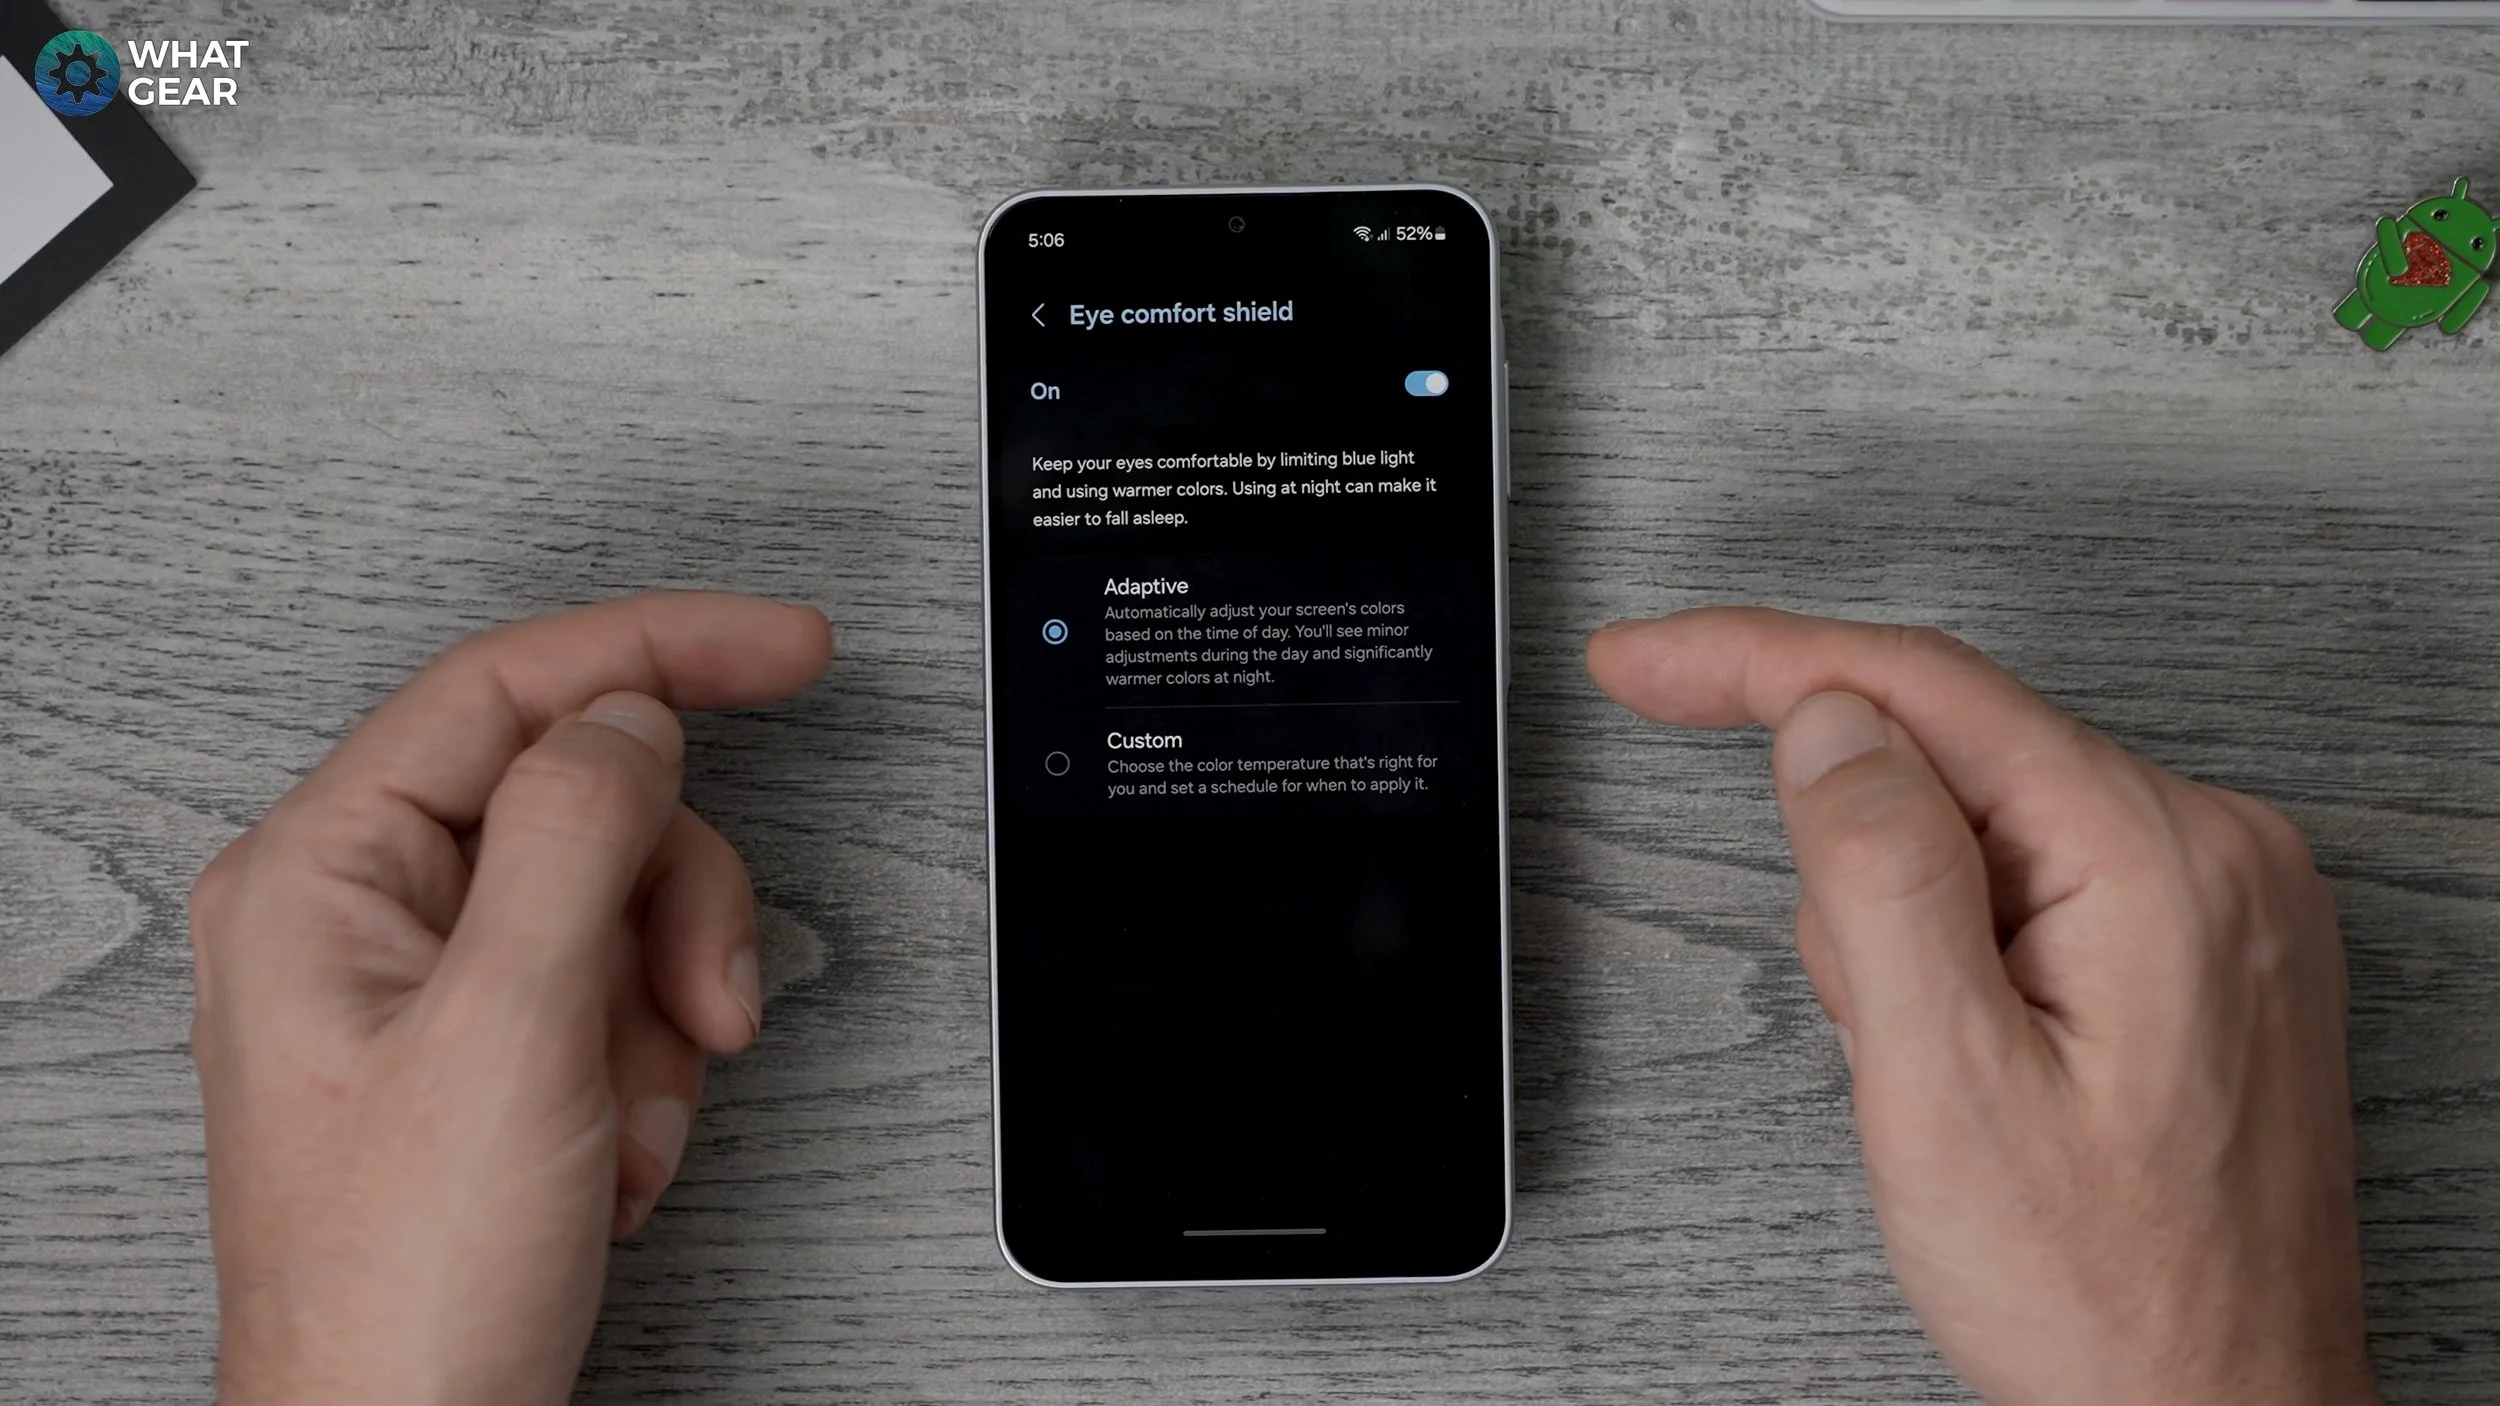
Make sure your adaptive brightness is on. I switched it off for this video so it's not constantly shifting, but what I want to show you here is this. The eye comfort shoe. This is actually switched off by default. So if you switch this on and set it to adaptive, it actually automatically will adjust the colors on the screen based on the lighting in your environment.
And when it is darker, it will actually adjust the blue light coming off the display. And if you want to, you can go into custom and set a custom color temperature. So you want it to be warmer, more orange hues for this. And then you can also set the schedule as to when it kicks in. So sunset to sunrise could be a good one. So if you care about your eyes, then definitely do this.
Stacked
All right, now let me show you one of my favorite features of one UI. There are very few other Android phones that can even do this, which is quite surprising. Check this out. I'm going to add a widget to the home screen.
This is the Digital Wellbeing widget. Now that you've placed this widget here, you can now create a stack. So if you hold your finger down on that widget, you'll see the option to create stack.
And it brings up all of the apps that can be stacked on top of this widget. So, for example, a good one to add might be the health widget.
We add that and if you hold your finger down again go to edit. You can actually swipe across hit the plus here and you can have quite a few different ones. So I'm going to add the device care widget here as well.
And the secure Wi-Fi. There we go. So now we have these rotating widgets taking up just one space on the screen as opposed to 4 or 5. So definitely make use of this. And do keep in mind all of the widgets, including the clock and the Google search bar do have the option to be stacked.
Hidden Tools
Okay, so there was a good reason why I chose these specific widgets. Well, two of them at least, and it is because they have very powerful tools within them. So check this out. If we scroll across to the Device Care widget, this little brush here will clear up any backgrounding apps and memory being used in the background. So this is a great tool to use before you're going to do any heavy gaming.
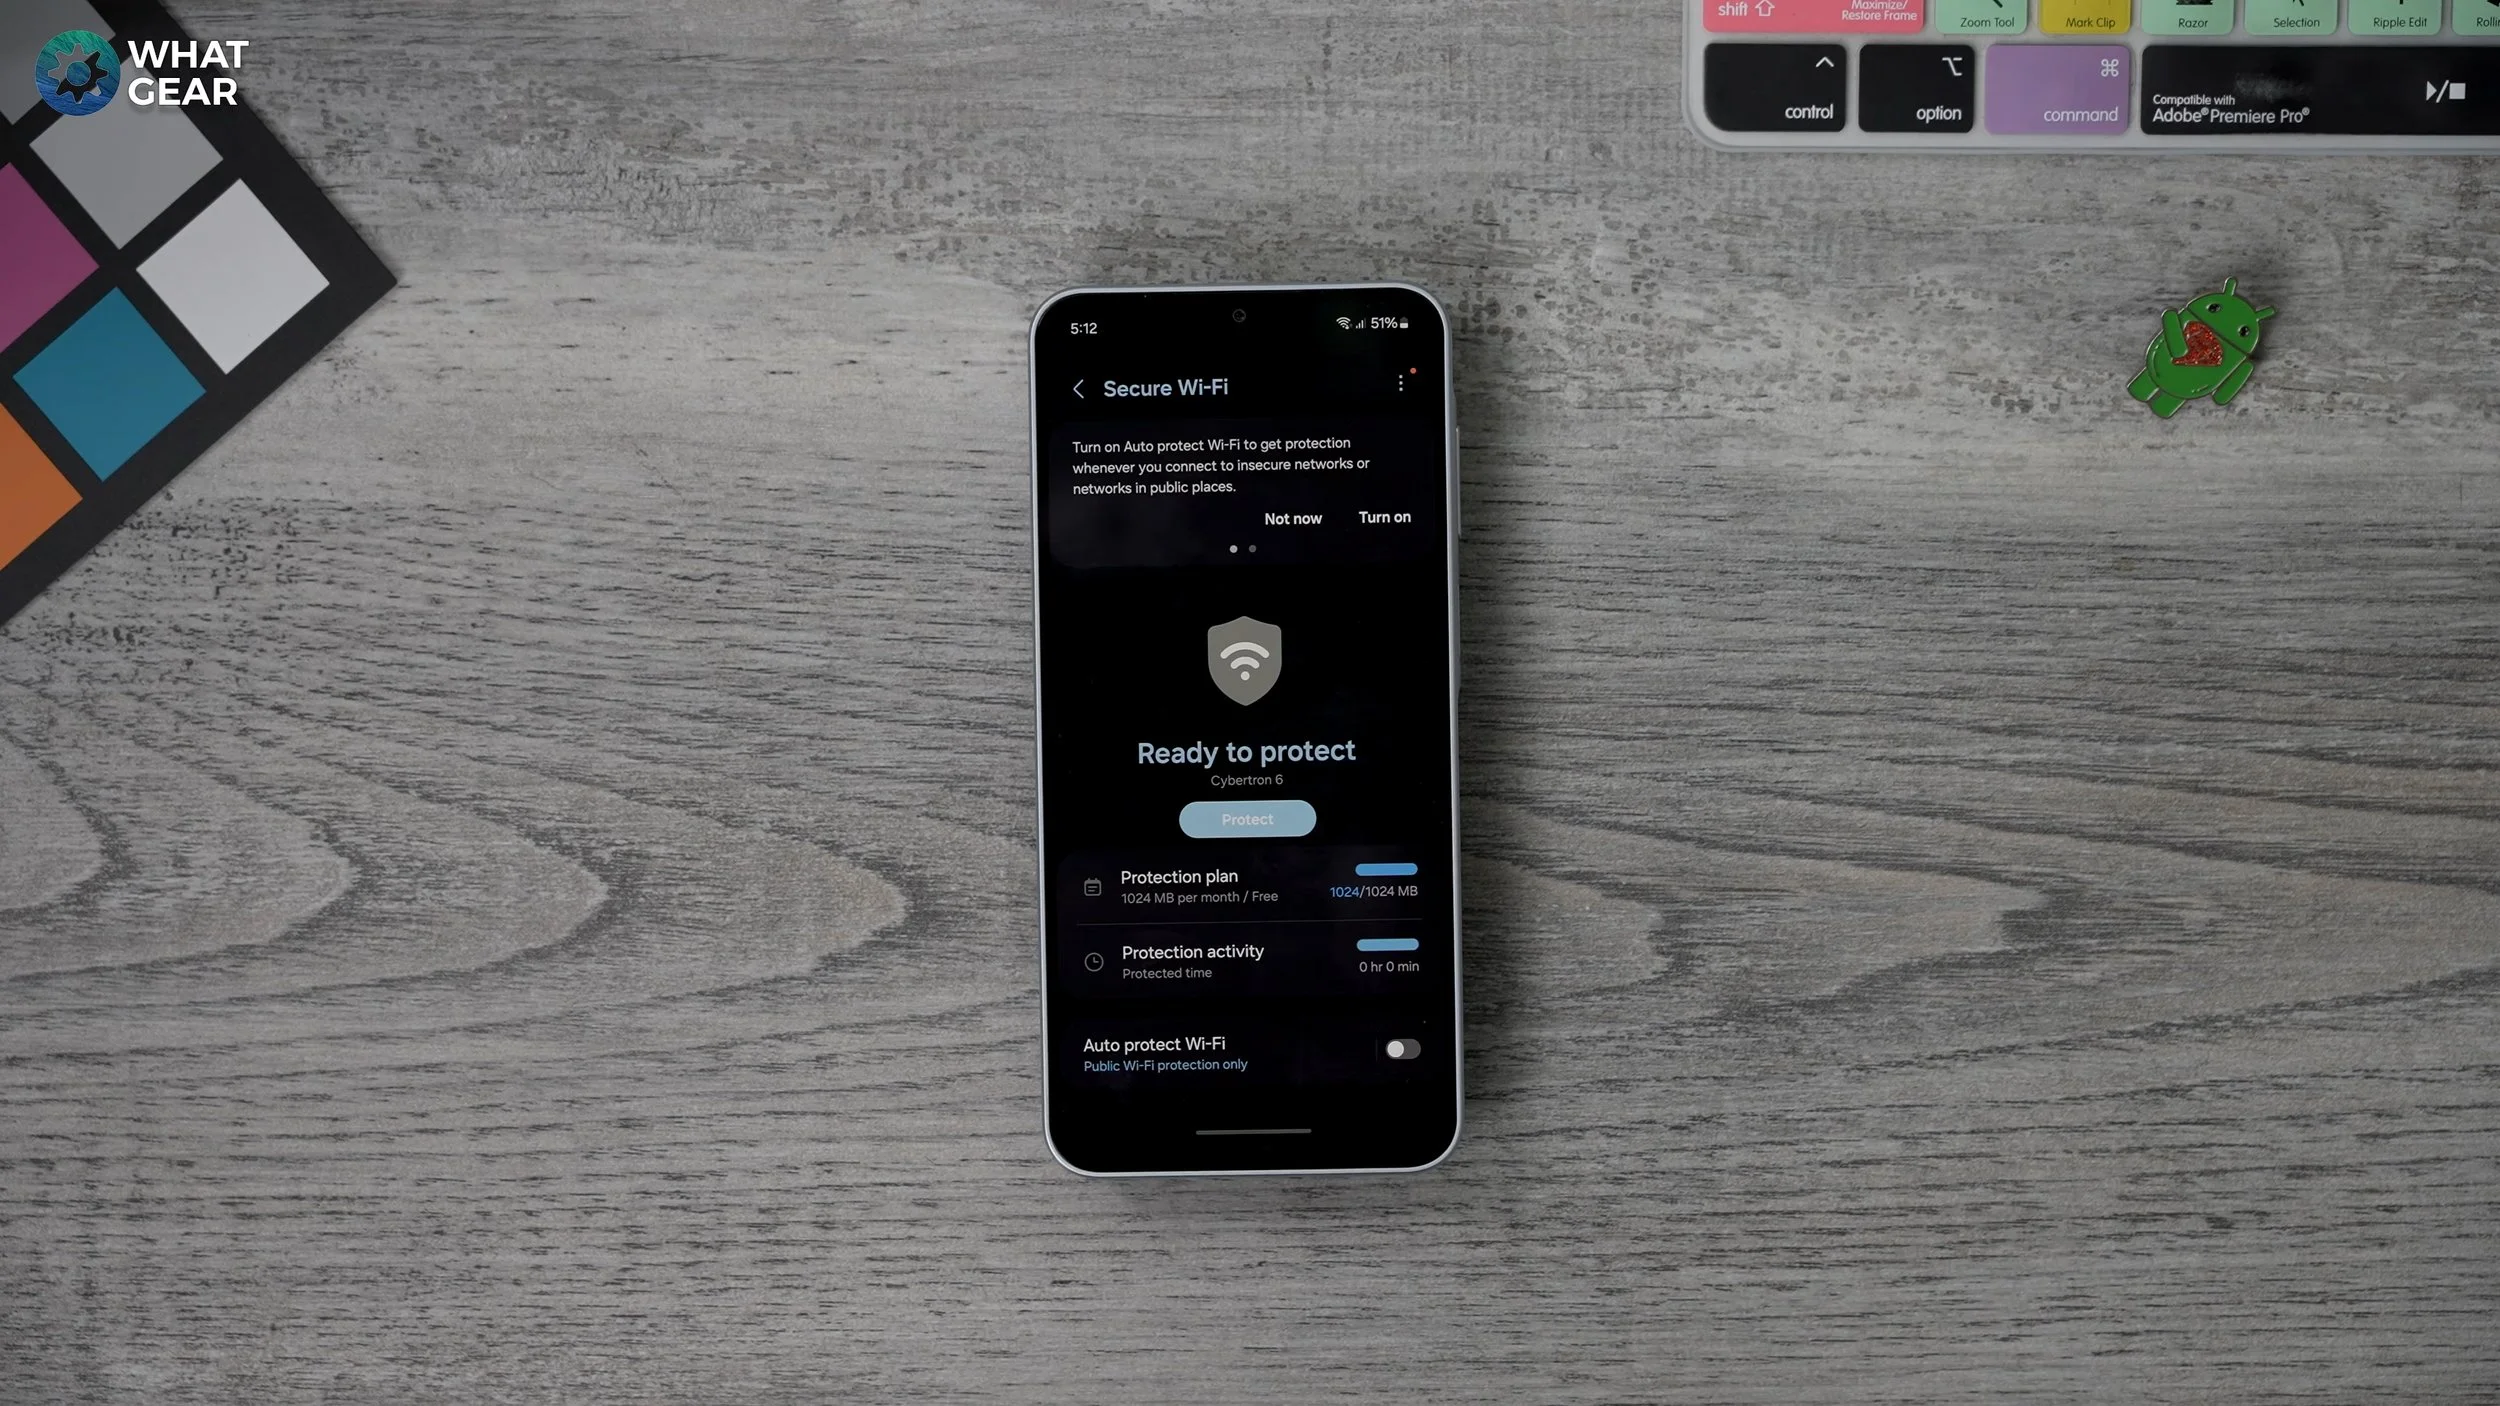
If the phone starts heating up or it feels like it's running a bit slow, hit this little brush here and that just clears everything that's happening in the background so that your phone can run at its optimal speed. The next one is very, very useful and it is the secure Wi-Fi. So what a lot of people don't realize is when you connect to a public Wi-Fi hotspot, you're actually sharing your data on encrypted to that modem. And that does mean people can intercept your data quite easily. So this right here, if you tap on it takes you to the secure Wi-Fi.
And Samsung actually give you one gig per month for free to use. So when you enable this, it secures your personal data and kind of encrypts it. Think of this as a kind of VPN, but is Samsung's own VPN.
So there's two ways to use it. You can either just tap the little shield here to activate it, or you can tap on the widget itself and come to the main page here and on the main page, if you're particularly concerned about your data when on public Wi-Fi, you can switch on the Auto Protect, and this will detect when you're on a public Wi-Fi and activate the secure Wi-Fi feature automatically.
Reach The Top
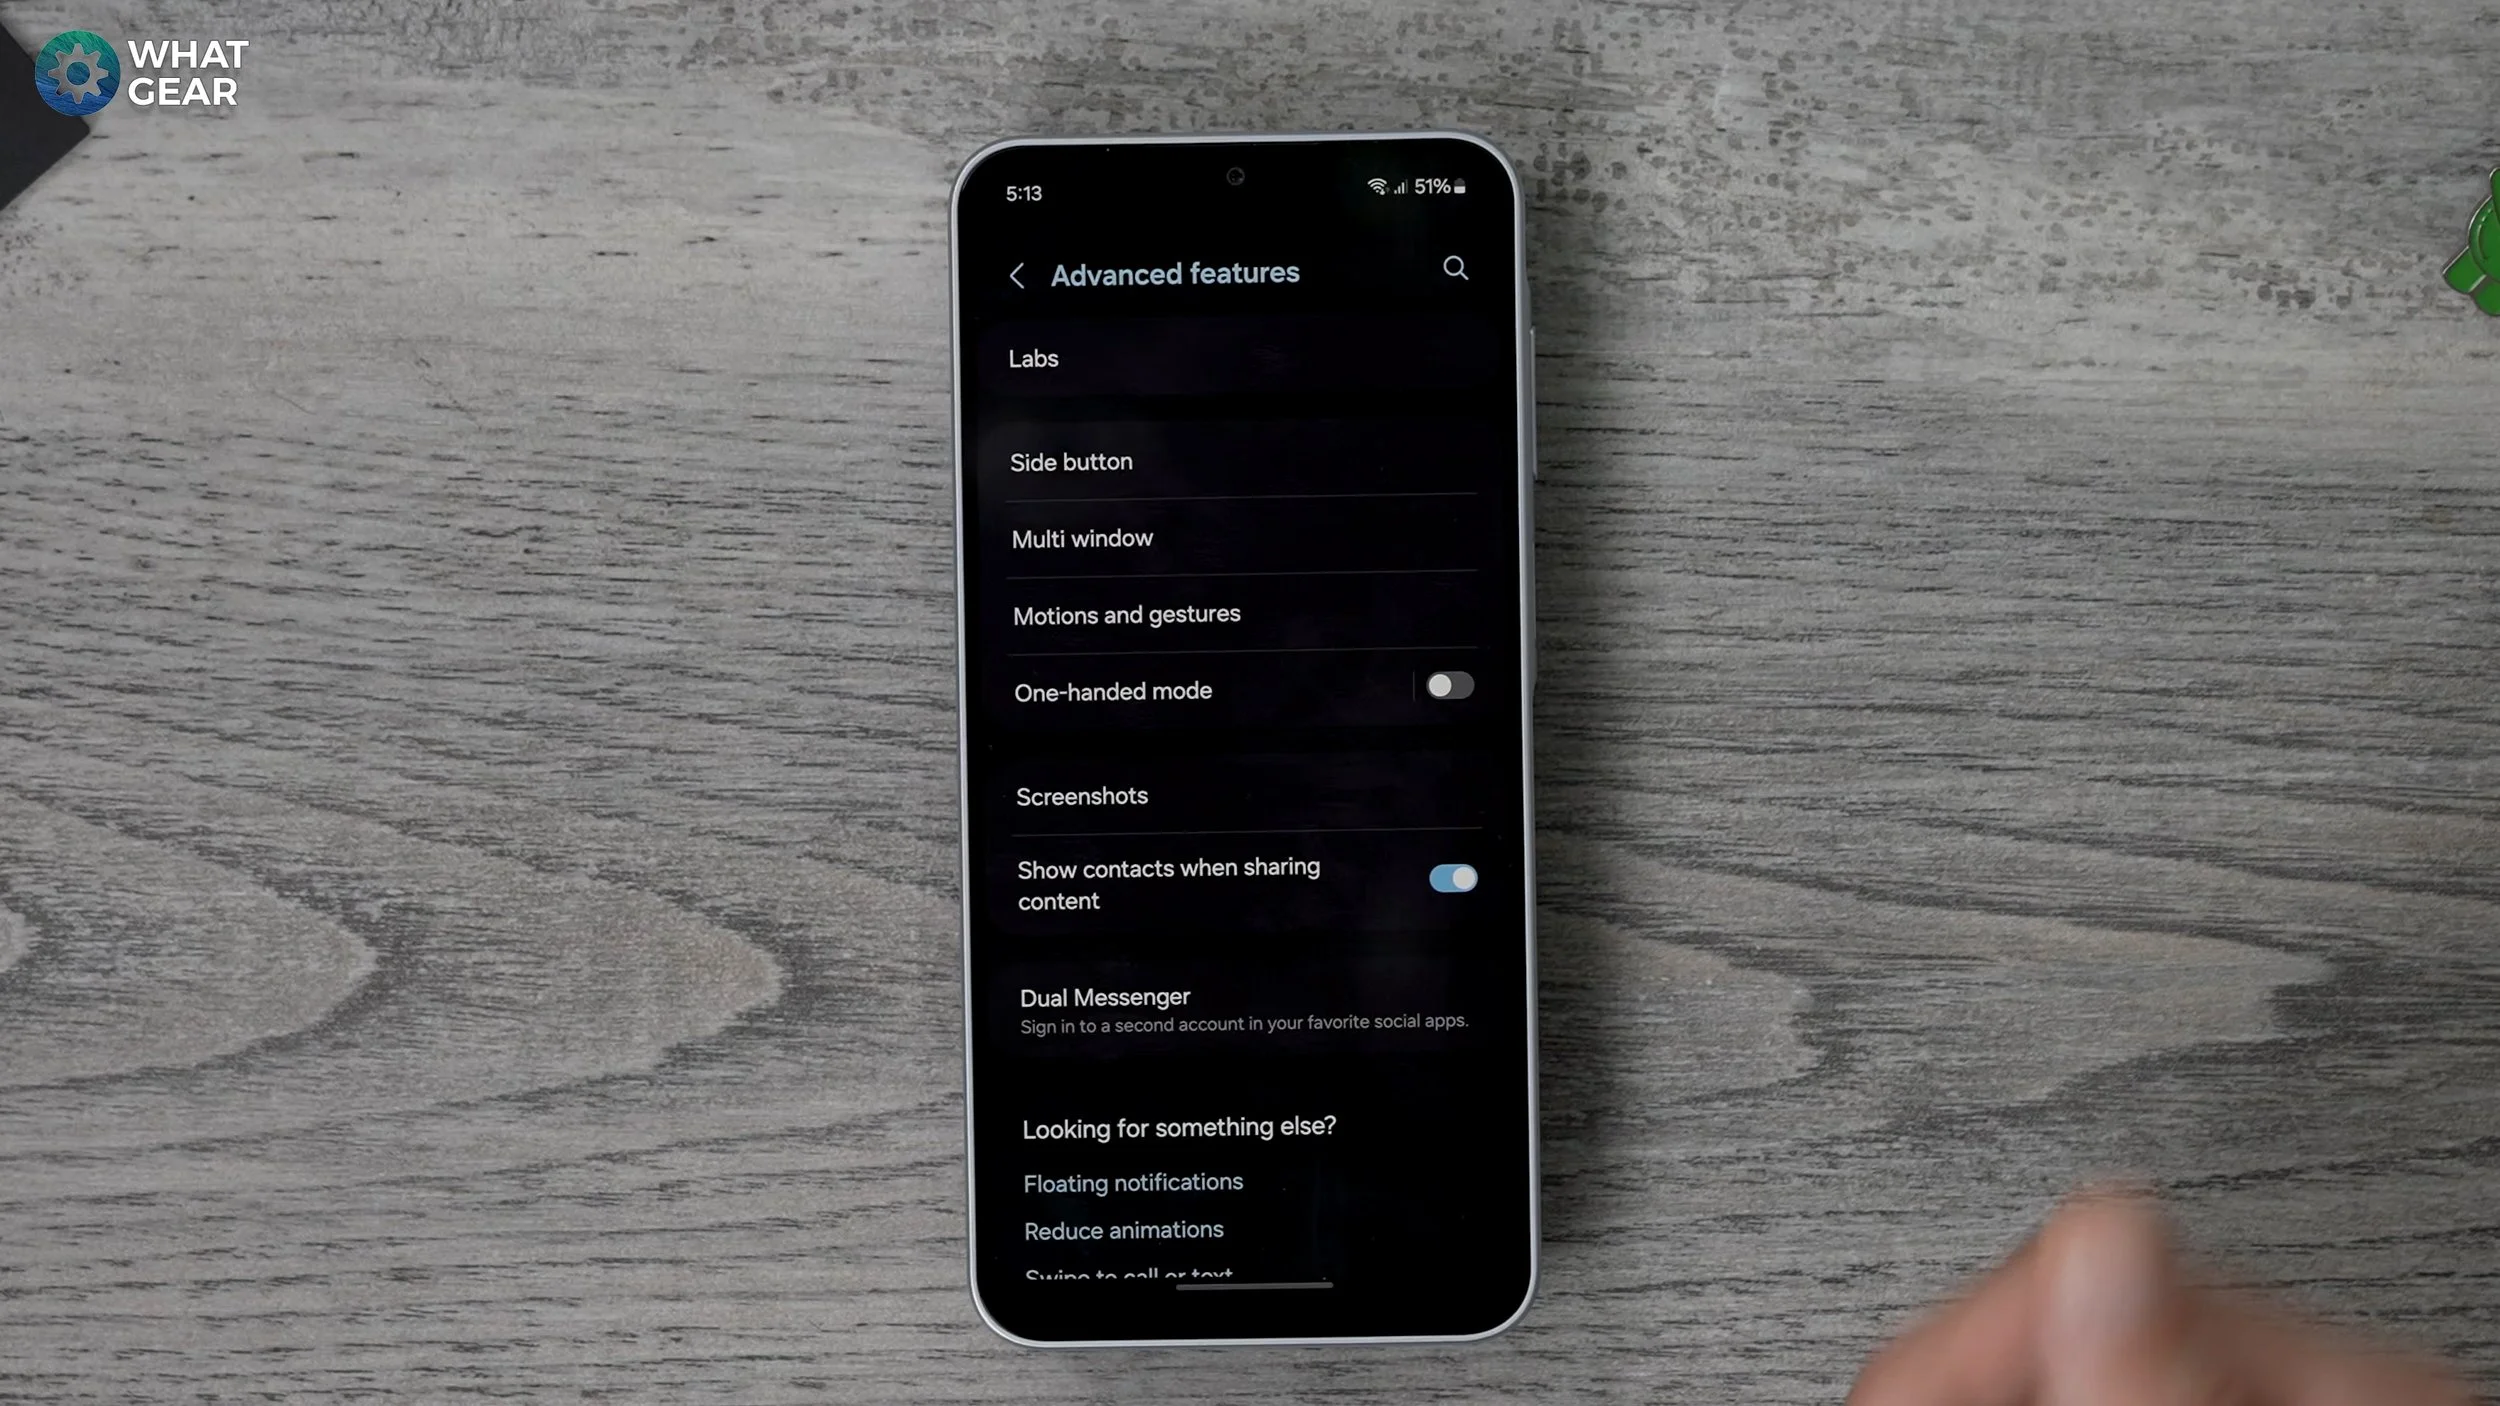
So when you have a big screen like this, sometimes it's hard to reach apps and things that might be at the top of the screen. So there's a good little trick here which is not enabled by default. So let me show you how to activate this. So jump into your settings, scroll down until you see advanced features again.
And here you will see the one handed mode. So once this is enabled you can reduce the size of the screen at any time. And it does change based on the navigation set up that you're using. If you're using the buttons, you need to double push the home button. If you're using the gestures, you just swipe down at the bottom of the screen.
So right here where the line is at the bottom, if you swipe down, it shrinks the screen and you can switch to the side depending on whether you're left or right handed. And then to maximize the screen again, just tap an empty space up here and it brings it back to full size.
Maximum Pixels
Now, even though the Galaxy A16 is one of the more affordable phones from Samsung, it does actually have a very good primary camera.
So I'm going to show you a little trick to get the most of that. Check this out. Let's open the camera. So by default when you open the camera you'll have photo video and portrait. And then up here you'll see 12 M. So this represents how many megapixels the images are that you're going to capture. But this phone does have a primary 50 megapixel sensor.
So if you want to capture more detail all you need to do is tap on the 12 M here and change it to the 50 megapixel. Do keep in mind, though, when you switch to 50 megapixels, the file sizes will be bigger, so your photos will take up more space. And also it won't work quite as well in lower light settings, so I recommend using that only when you're in a well-lit scenario and you want to capture all of the detail. For example, a landscape shot.
More Camera Tweaks
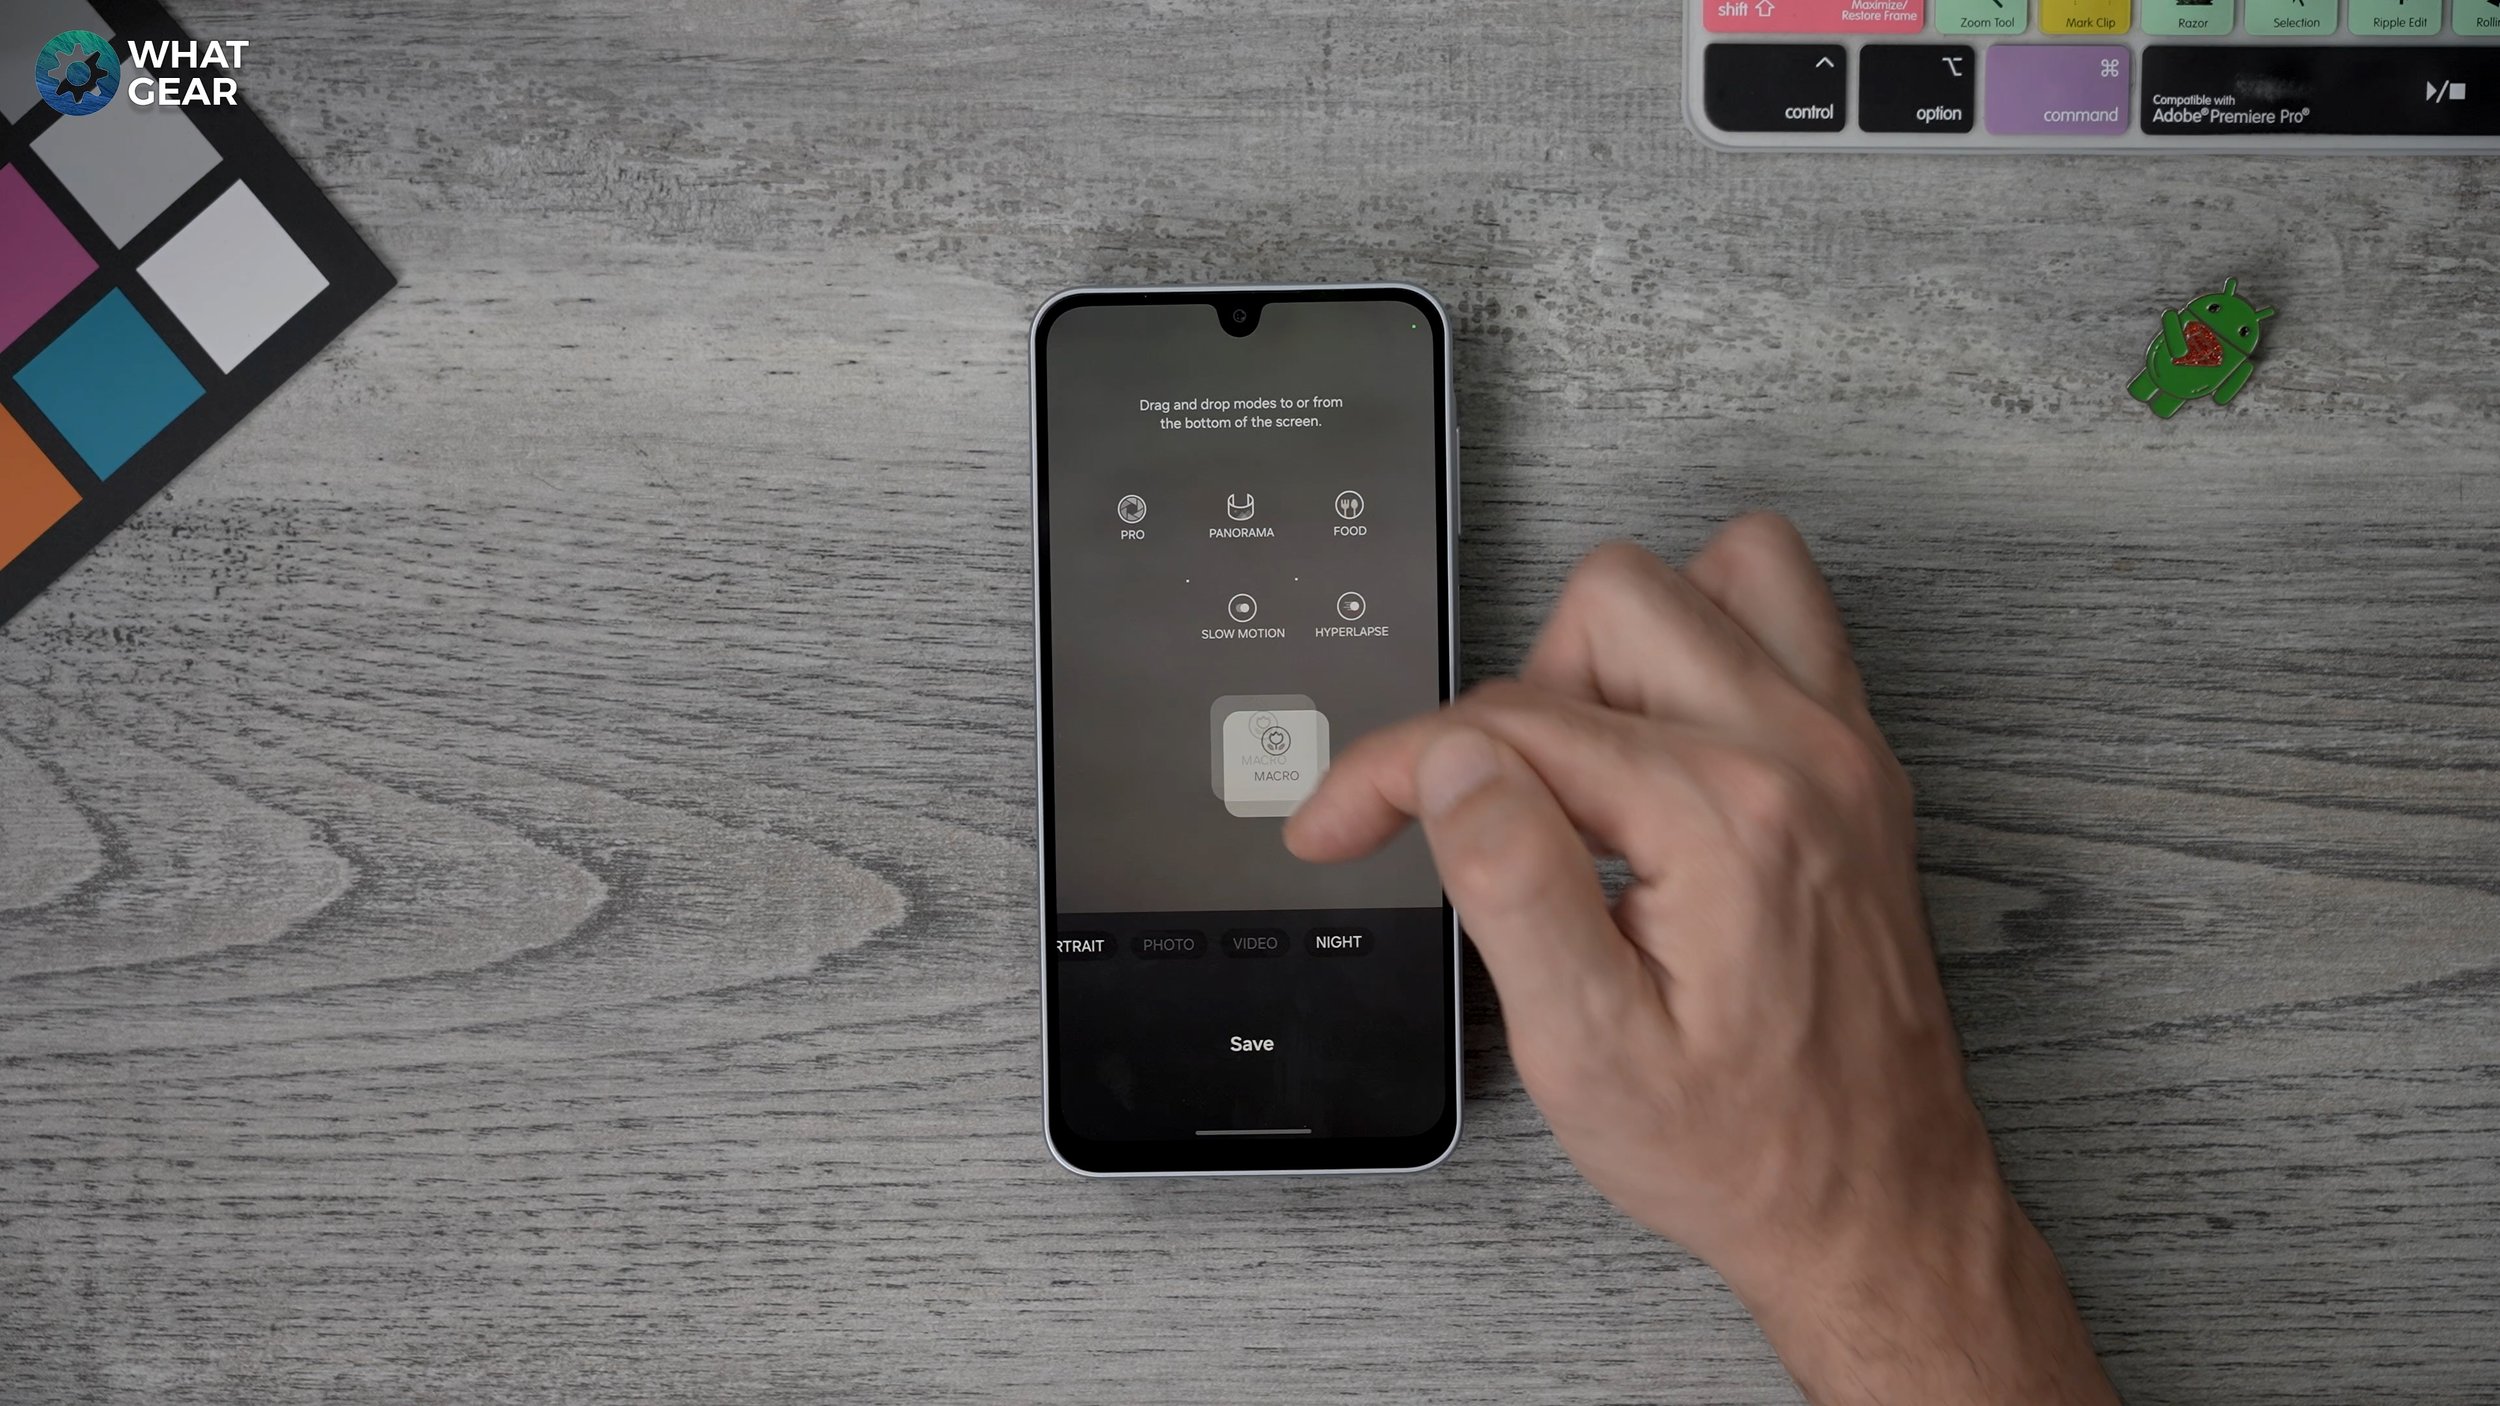
Now, before we move on, there is a couple more tweaks that I recommend you make the most of because they can be very, very useful if you hit the more section here and hit the plus at the side, you can actually add any of these to that bottom row. And the two that I recommend you set up is the night.
So if you grab that, we drag it down. So the macro allows you to take photos at very close distances. And if you appreciate pro camera settings you could of course add the Pro camera down here as well. This is really for people who know how to use ISO and shutter speed and all that kind of stuff. Now that's done, you have the three standard ones, but now you've got night mode, Pro mode and macro at your disposal as well.
Camera Settings
So when it comes to camera, there's a couple more settings that I think you might appreciate. So check this out. Open your camera, go to the settings in the top left corner on this page. Here you'll have the option to enable high efficiency pictures. So if you are going to be shooting a lot of the time with the 50 megapixel mode, you could enable this.
And this will actually compress the image size to be smaller. And you can also do the same thing with video recordings if you want to. So if you know you're going to be filming lots of video and you don't want to take up too much space, you can enable that. But one thing that I absolutely recommend you do is switch on the grid lines.
So this just adds a nice grid so you can use the rule of thirds. And also you can use these lines to line up the horizon and things like that. That way you just get better pictures. And a little pro tip if you line up the intersections of these lines with focal points, that is one of the best ways to use the rule of thirds.
Keep It Safe
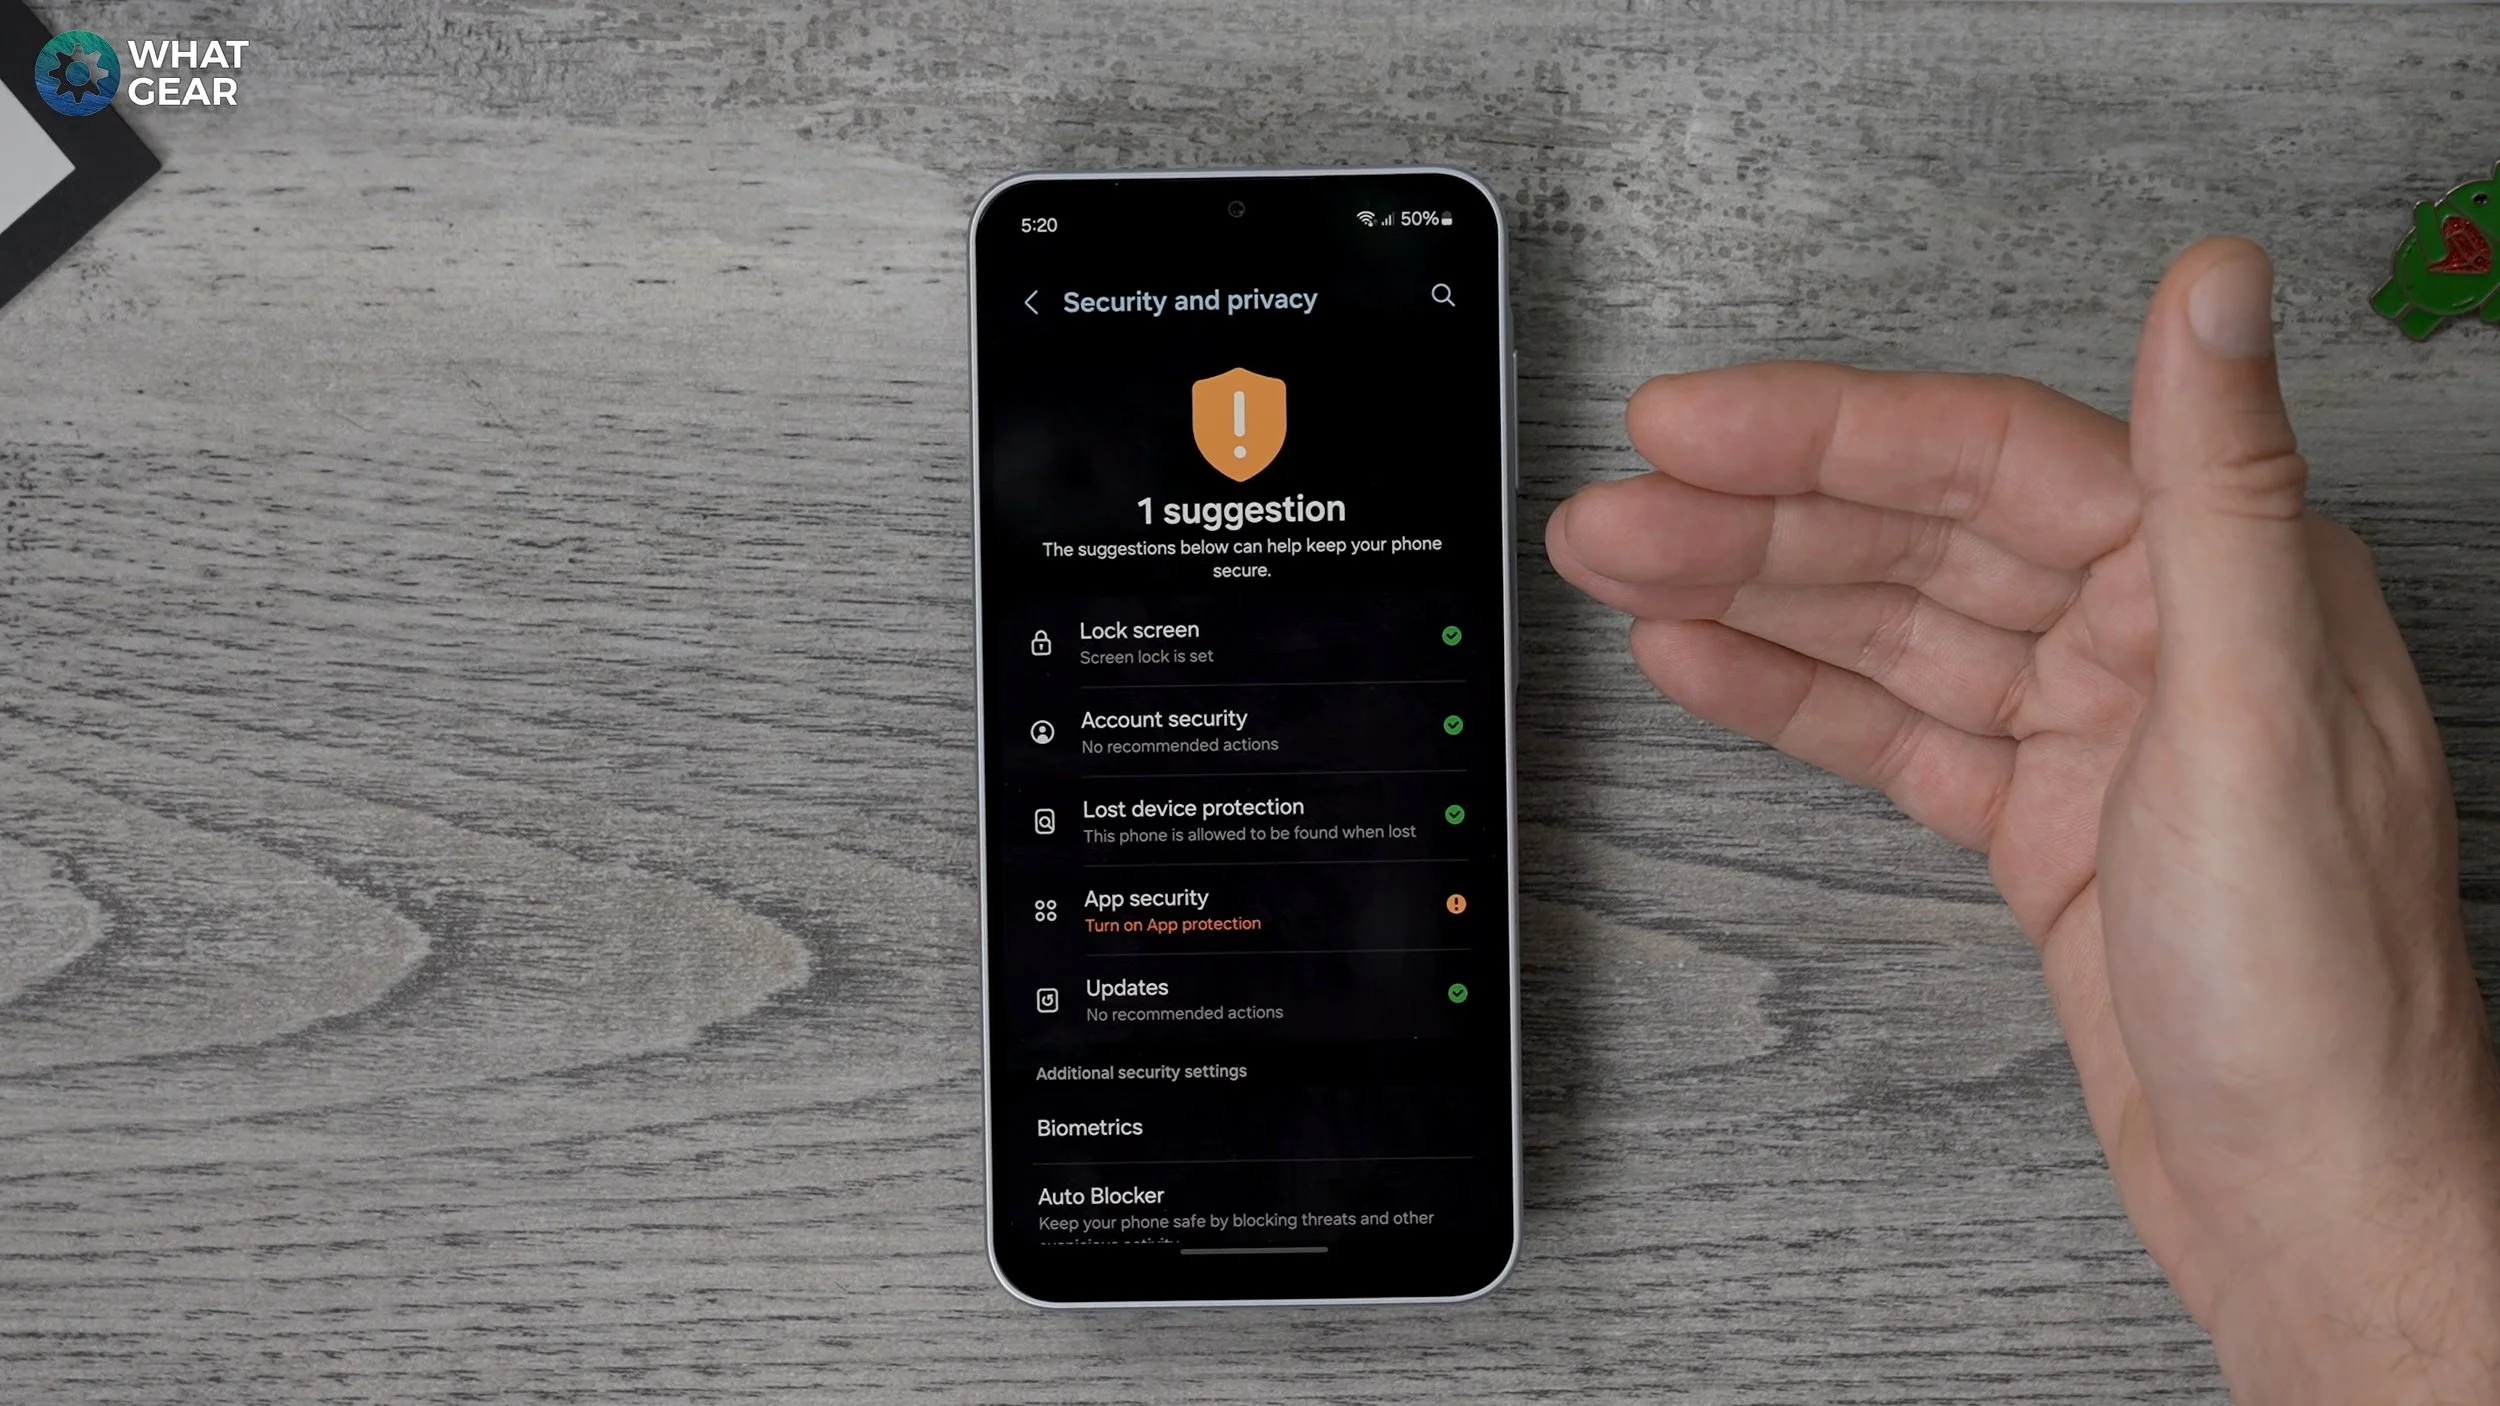
So this next one is very, very important. And a lot of people might overlook this. And it is in regards to the security of your phone. So check this out. Jump into your settings. Go to Security and Privacy. This does a scan of your phone as soon as you open it up, and if you see any suggestions here, then I do recommend you take a look at them.
So by default the app protection feature is switched off. So that means your phone unless you do this won't detect if there's a malicious app being installed. So I do recommend you switch this on. And at any time you can scan the device to see if anything is, a little bit suspicious.
Quicker Quick Settings
So this next one is going to be very, very useful.
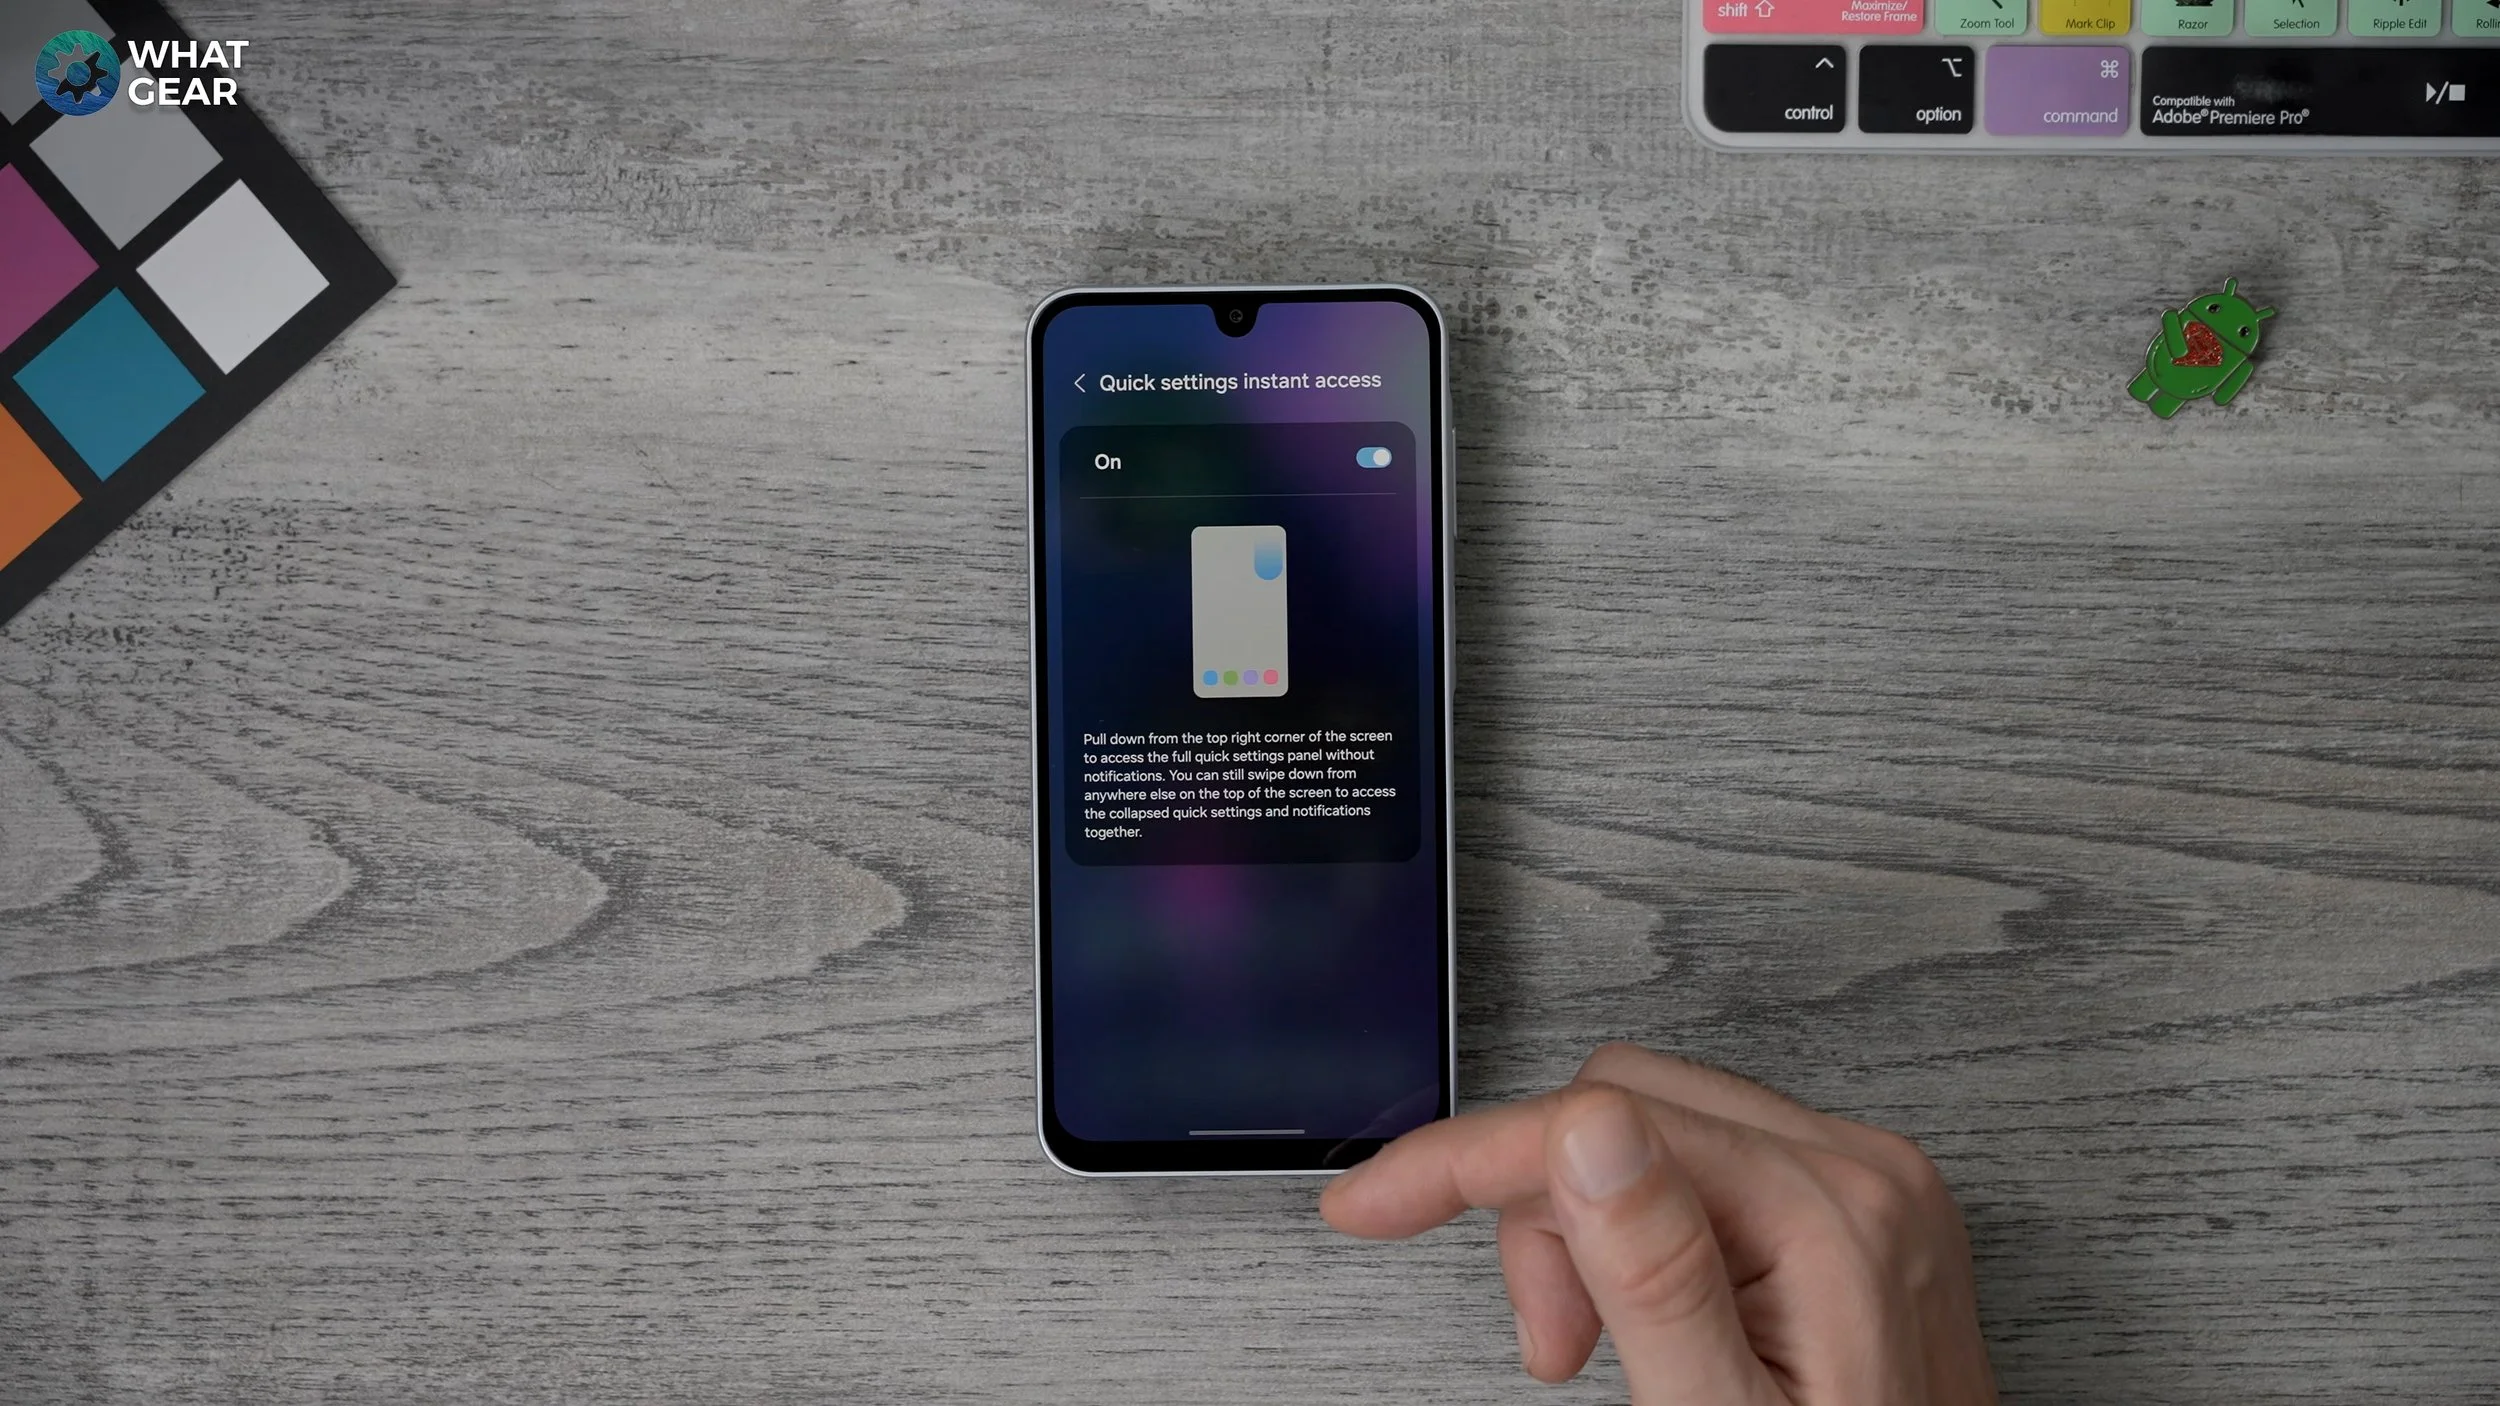
Some very powerful tool if you set it up the right way. So if you swipe down from the top and swipe down again, this area here are your quick settings and see how I had to swipe down twice to get to it. We can actually make it even easier to access. So if you hit the pen here and go to this section here quick Settings instant Access.
This activates the top right corner of the screen to bring down the full Quick Settings panel in one go. So now instead of having to swipe twice, you can just swipe once and you get the full quick settings. And because that area is activated, if you want your notifications, you swipe down anywhere else and you have all your notifications there.
Upgraded Quick Settings
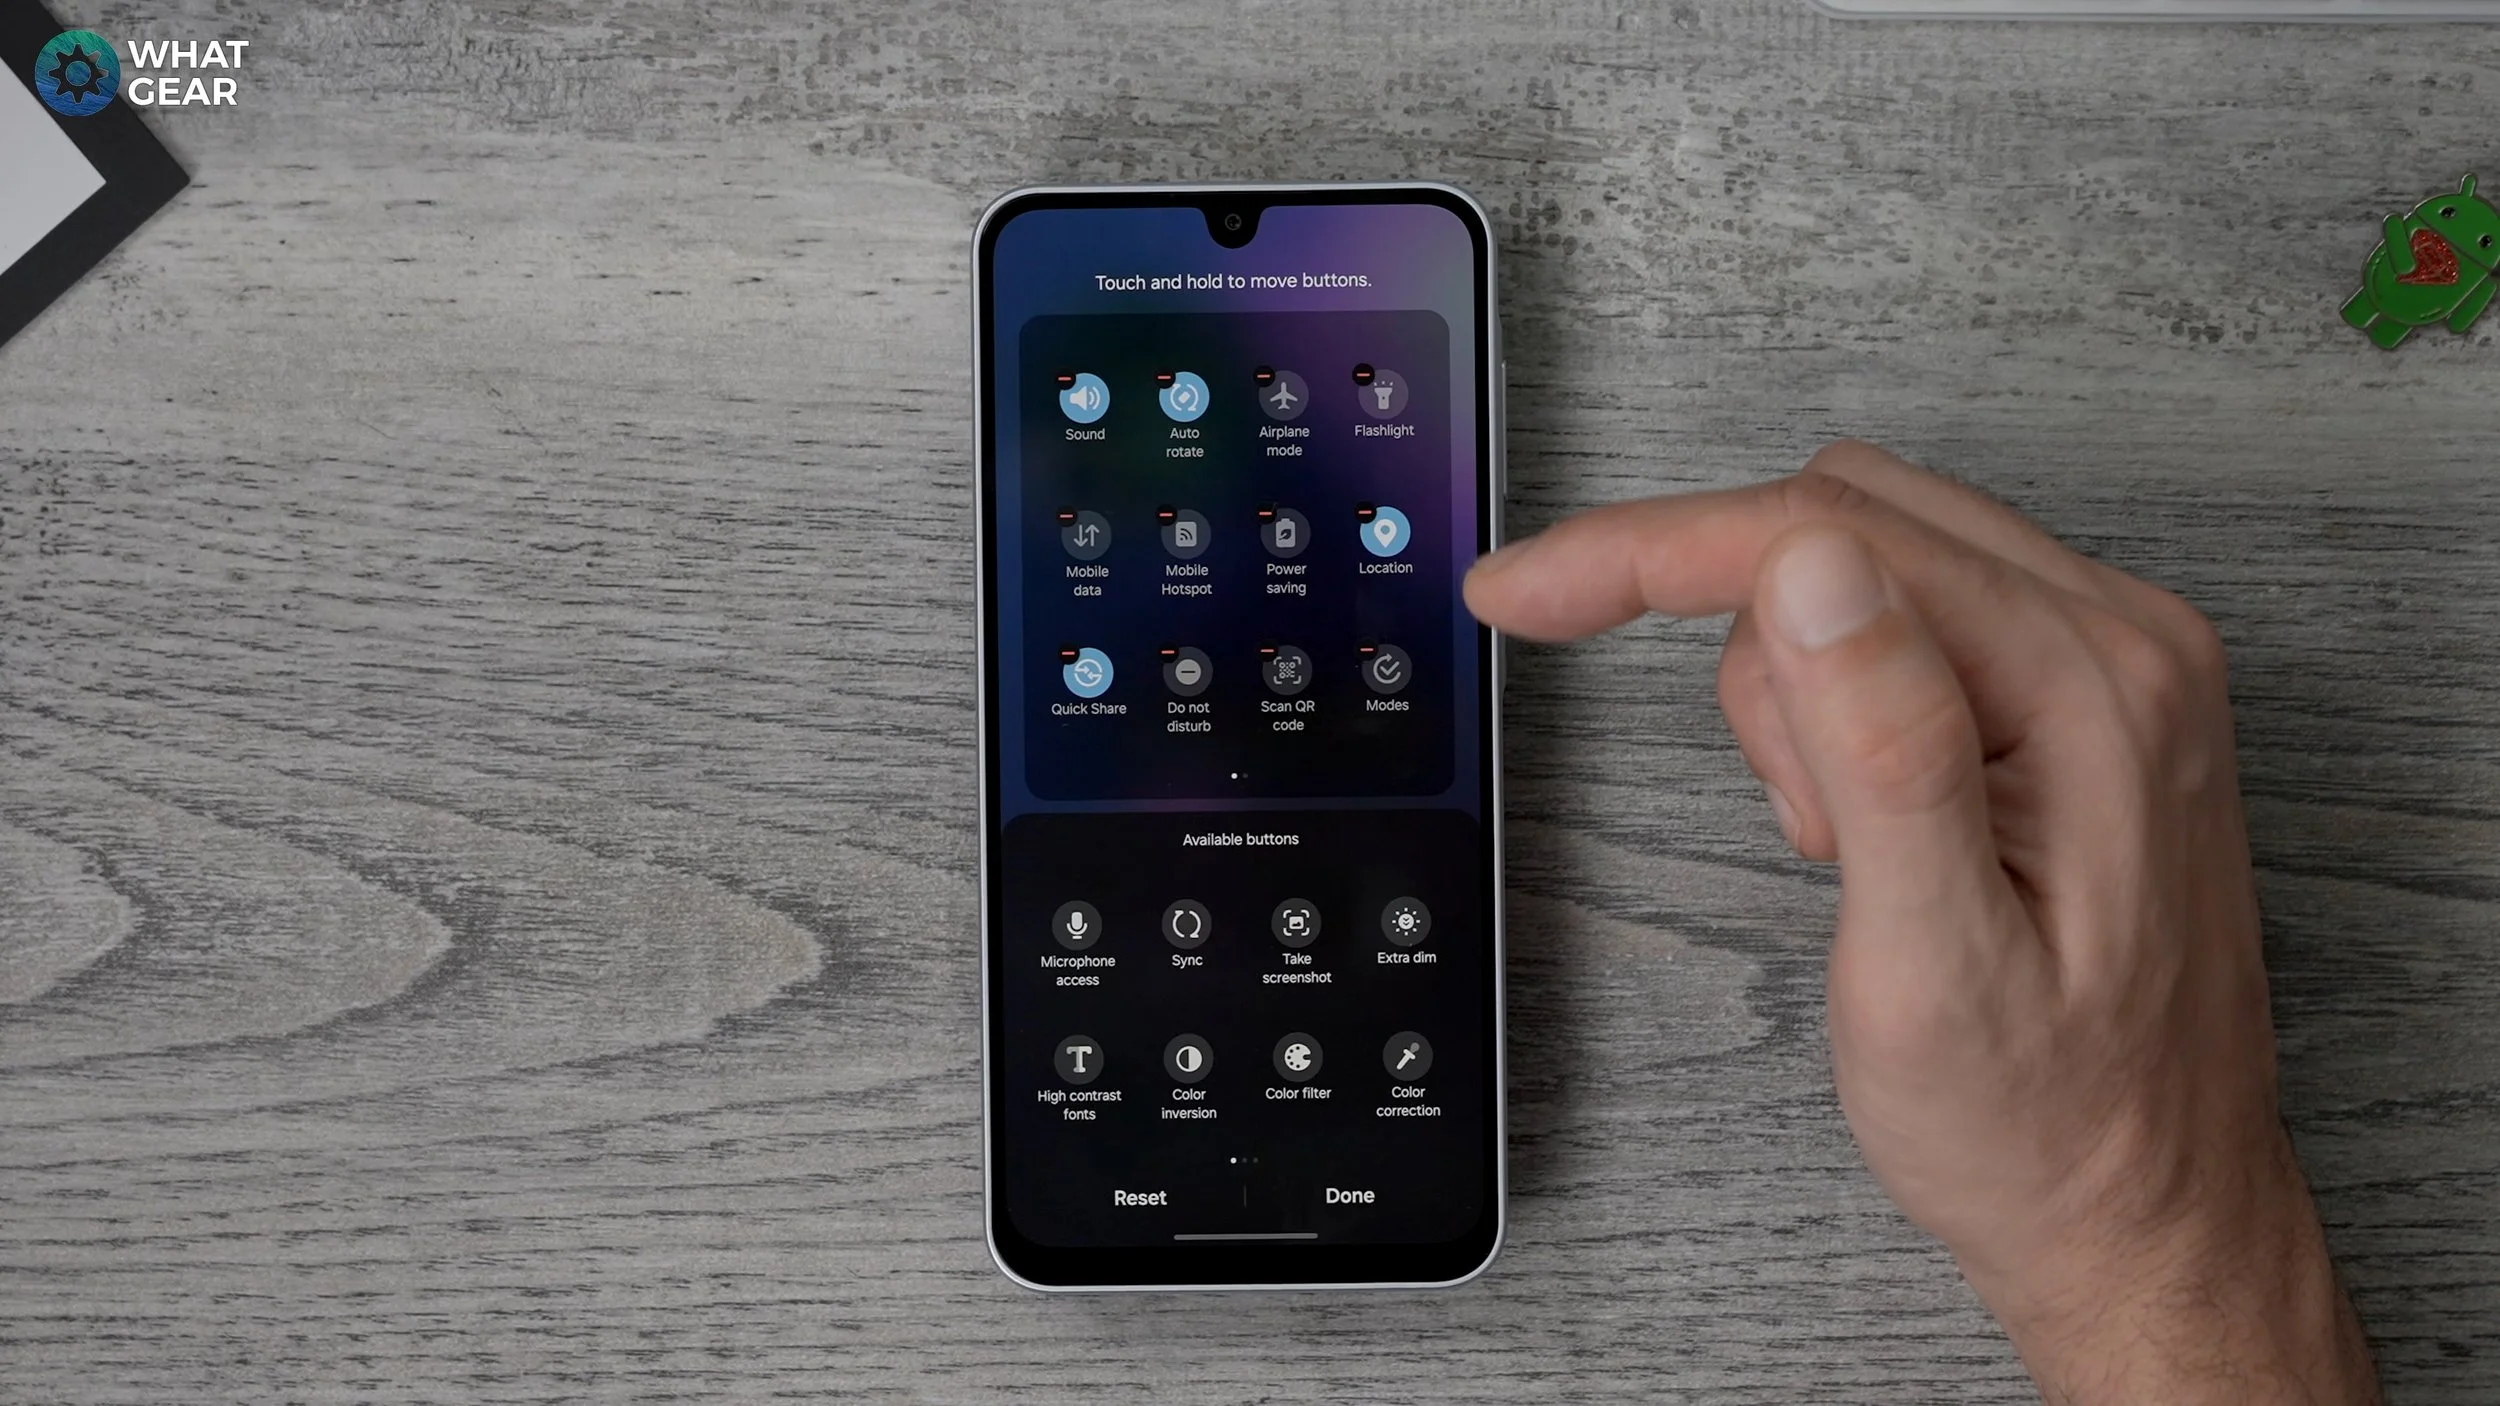
So now let me give you a couple of suggestions of how you could improve the quick settings. So if you swipe down top right corner bring down the full menu, hit the pen, and if you go to edit, you can remove anything that's already there just hitting the minuses next to them. So if there's anything you're not going to use, just get rid of those.
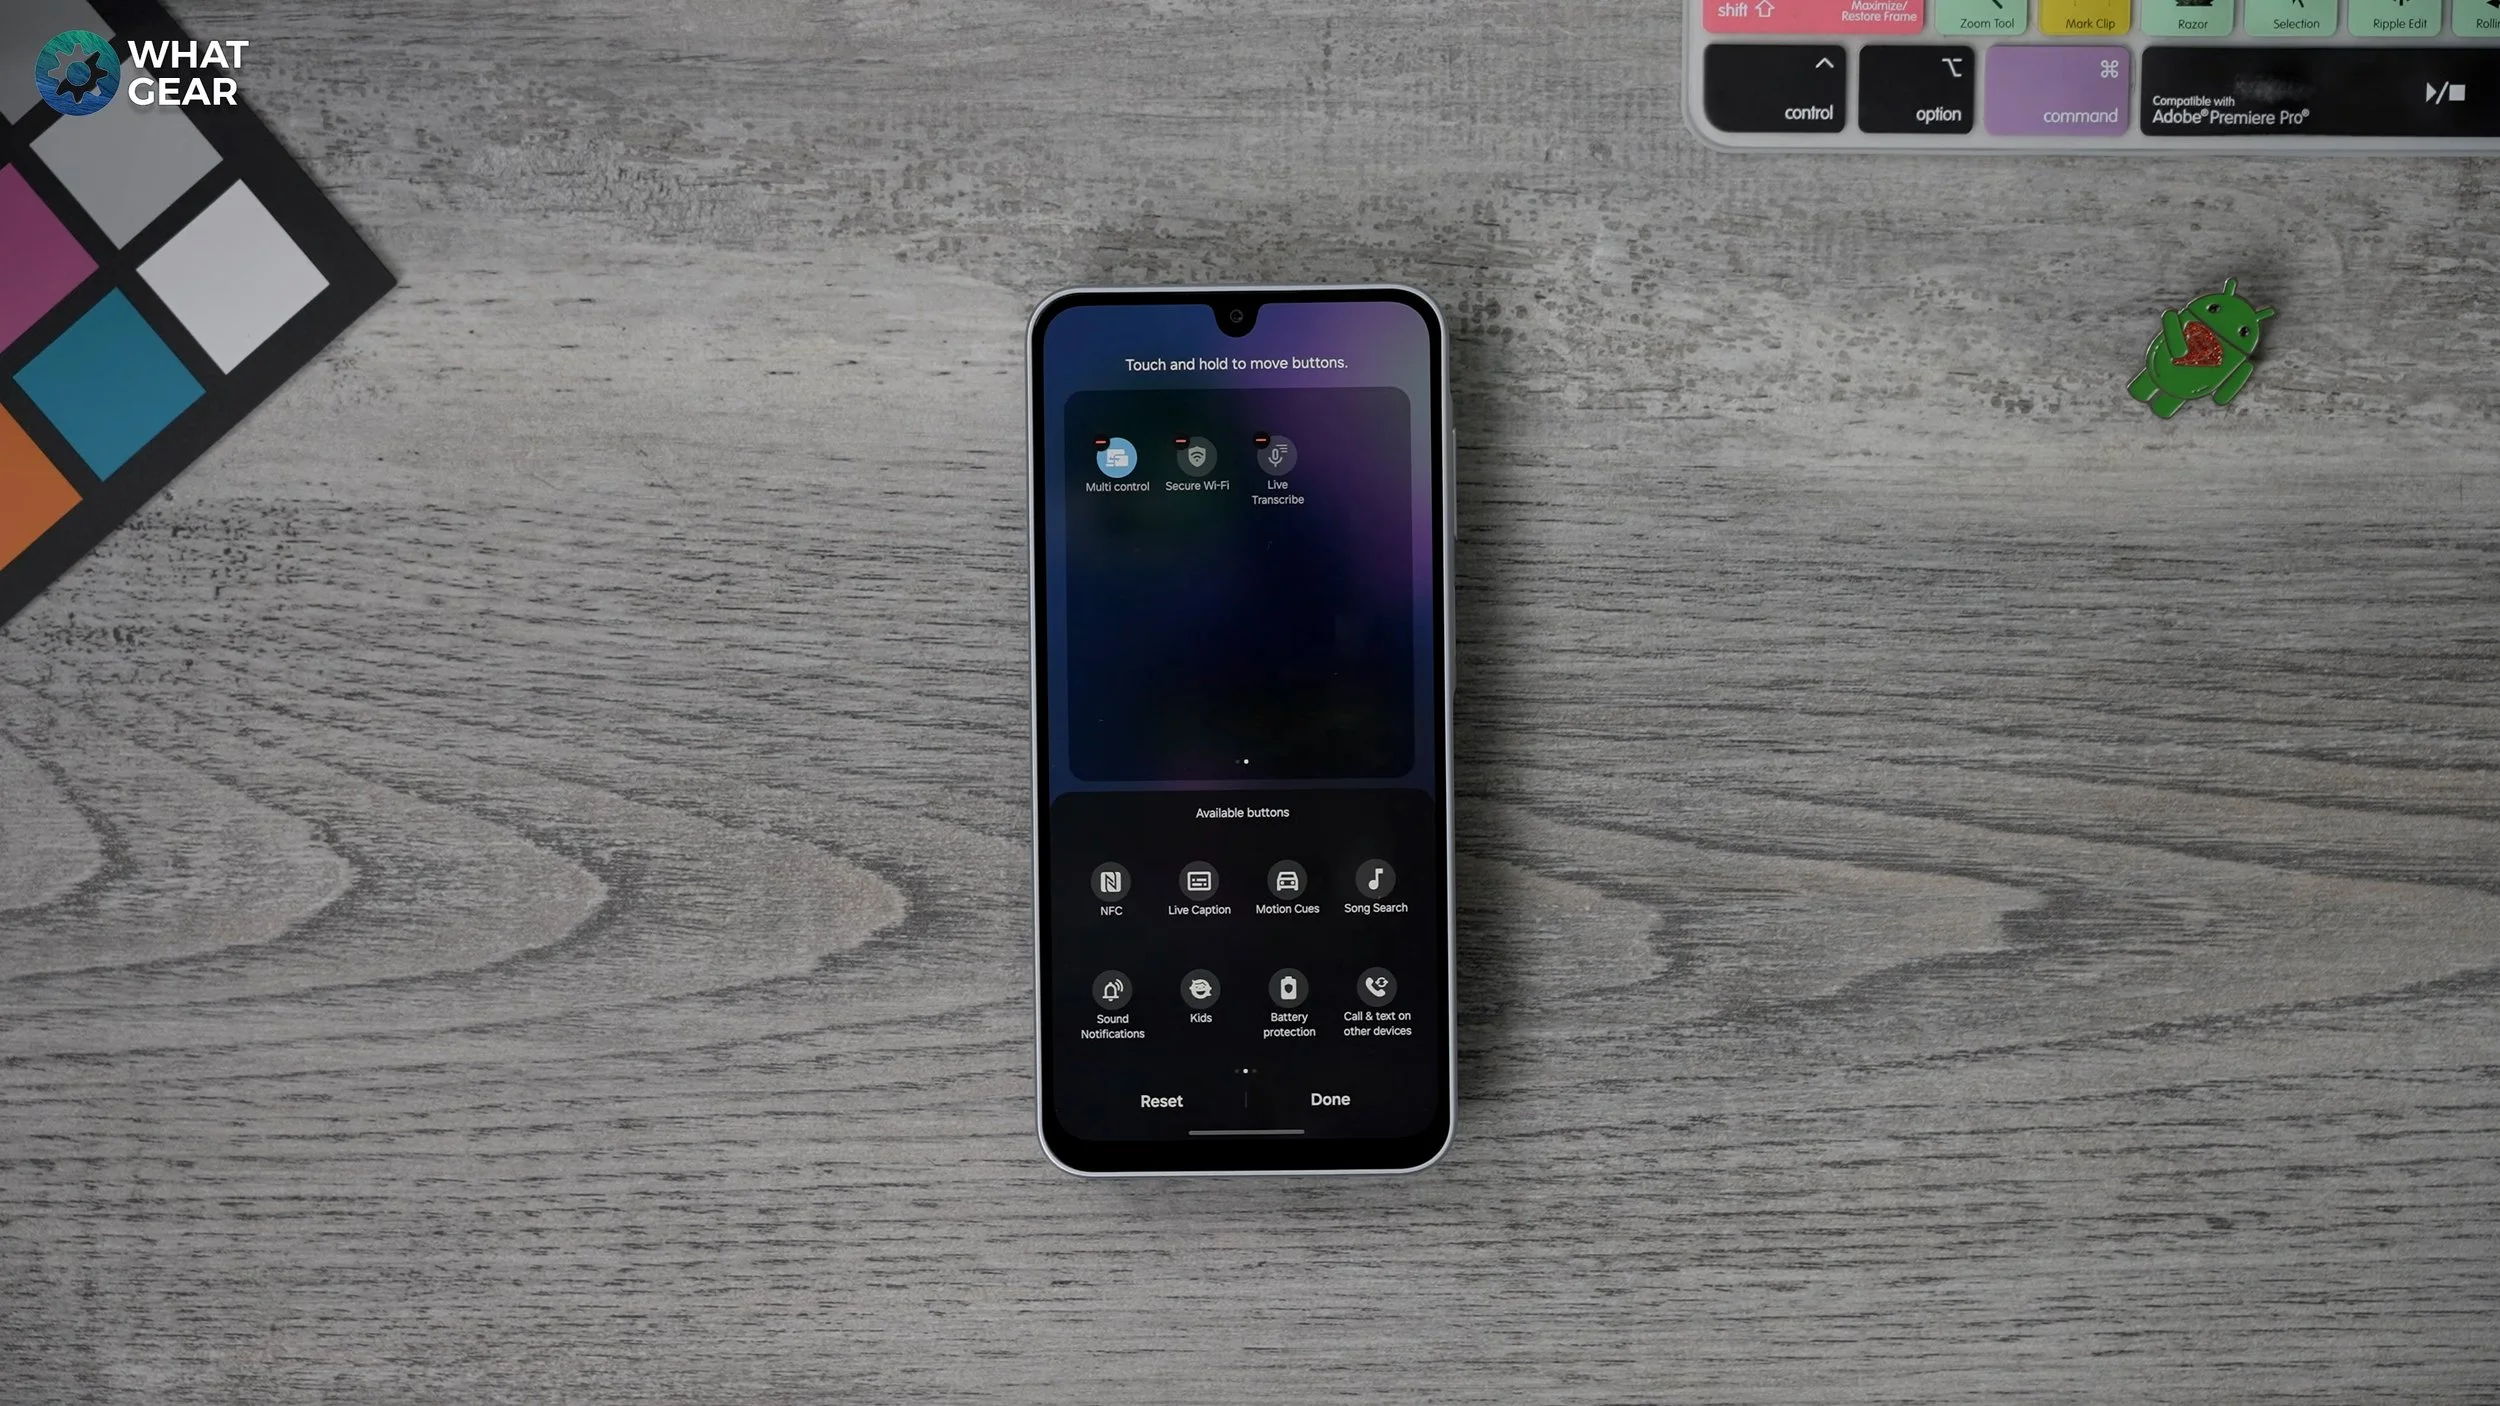
But a couple of things that I do recommend you use which aren't enabled out of the box are these swipe across secure Wi-Fi is a good one, and you already know why. Live transcribe can also be very useful, so search is great. So if there is a song playing in the background, you want to know what song that is.
You can just bring down your quick settings and find out very quickly. And a nice little feature which upgrades your audio when connected via Bluetooth headphones is the Dolby Atmos.
This significantly improves the sound when watching movies and things like that in most cases. Not always, but I do recommend you add these to your quick settings and reorganize them in a way that makes sense to you.
Colour Coded Contacts
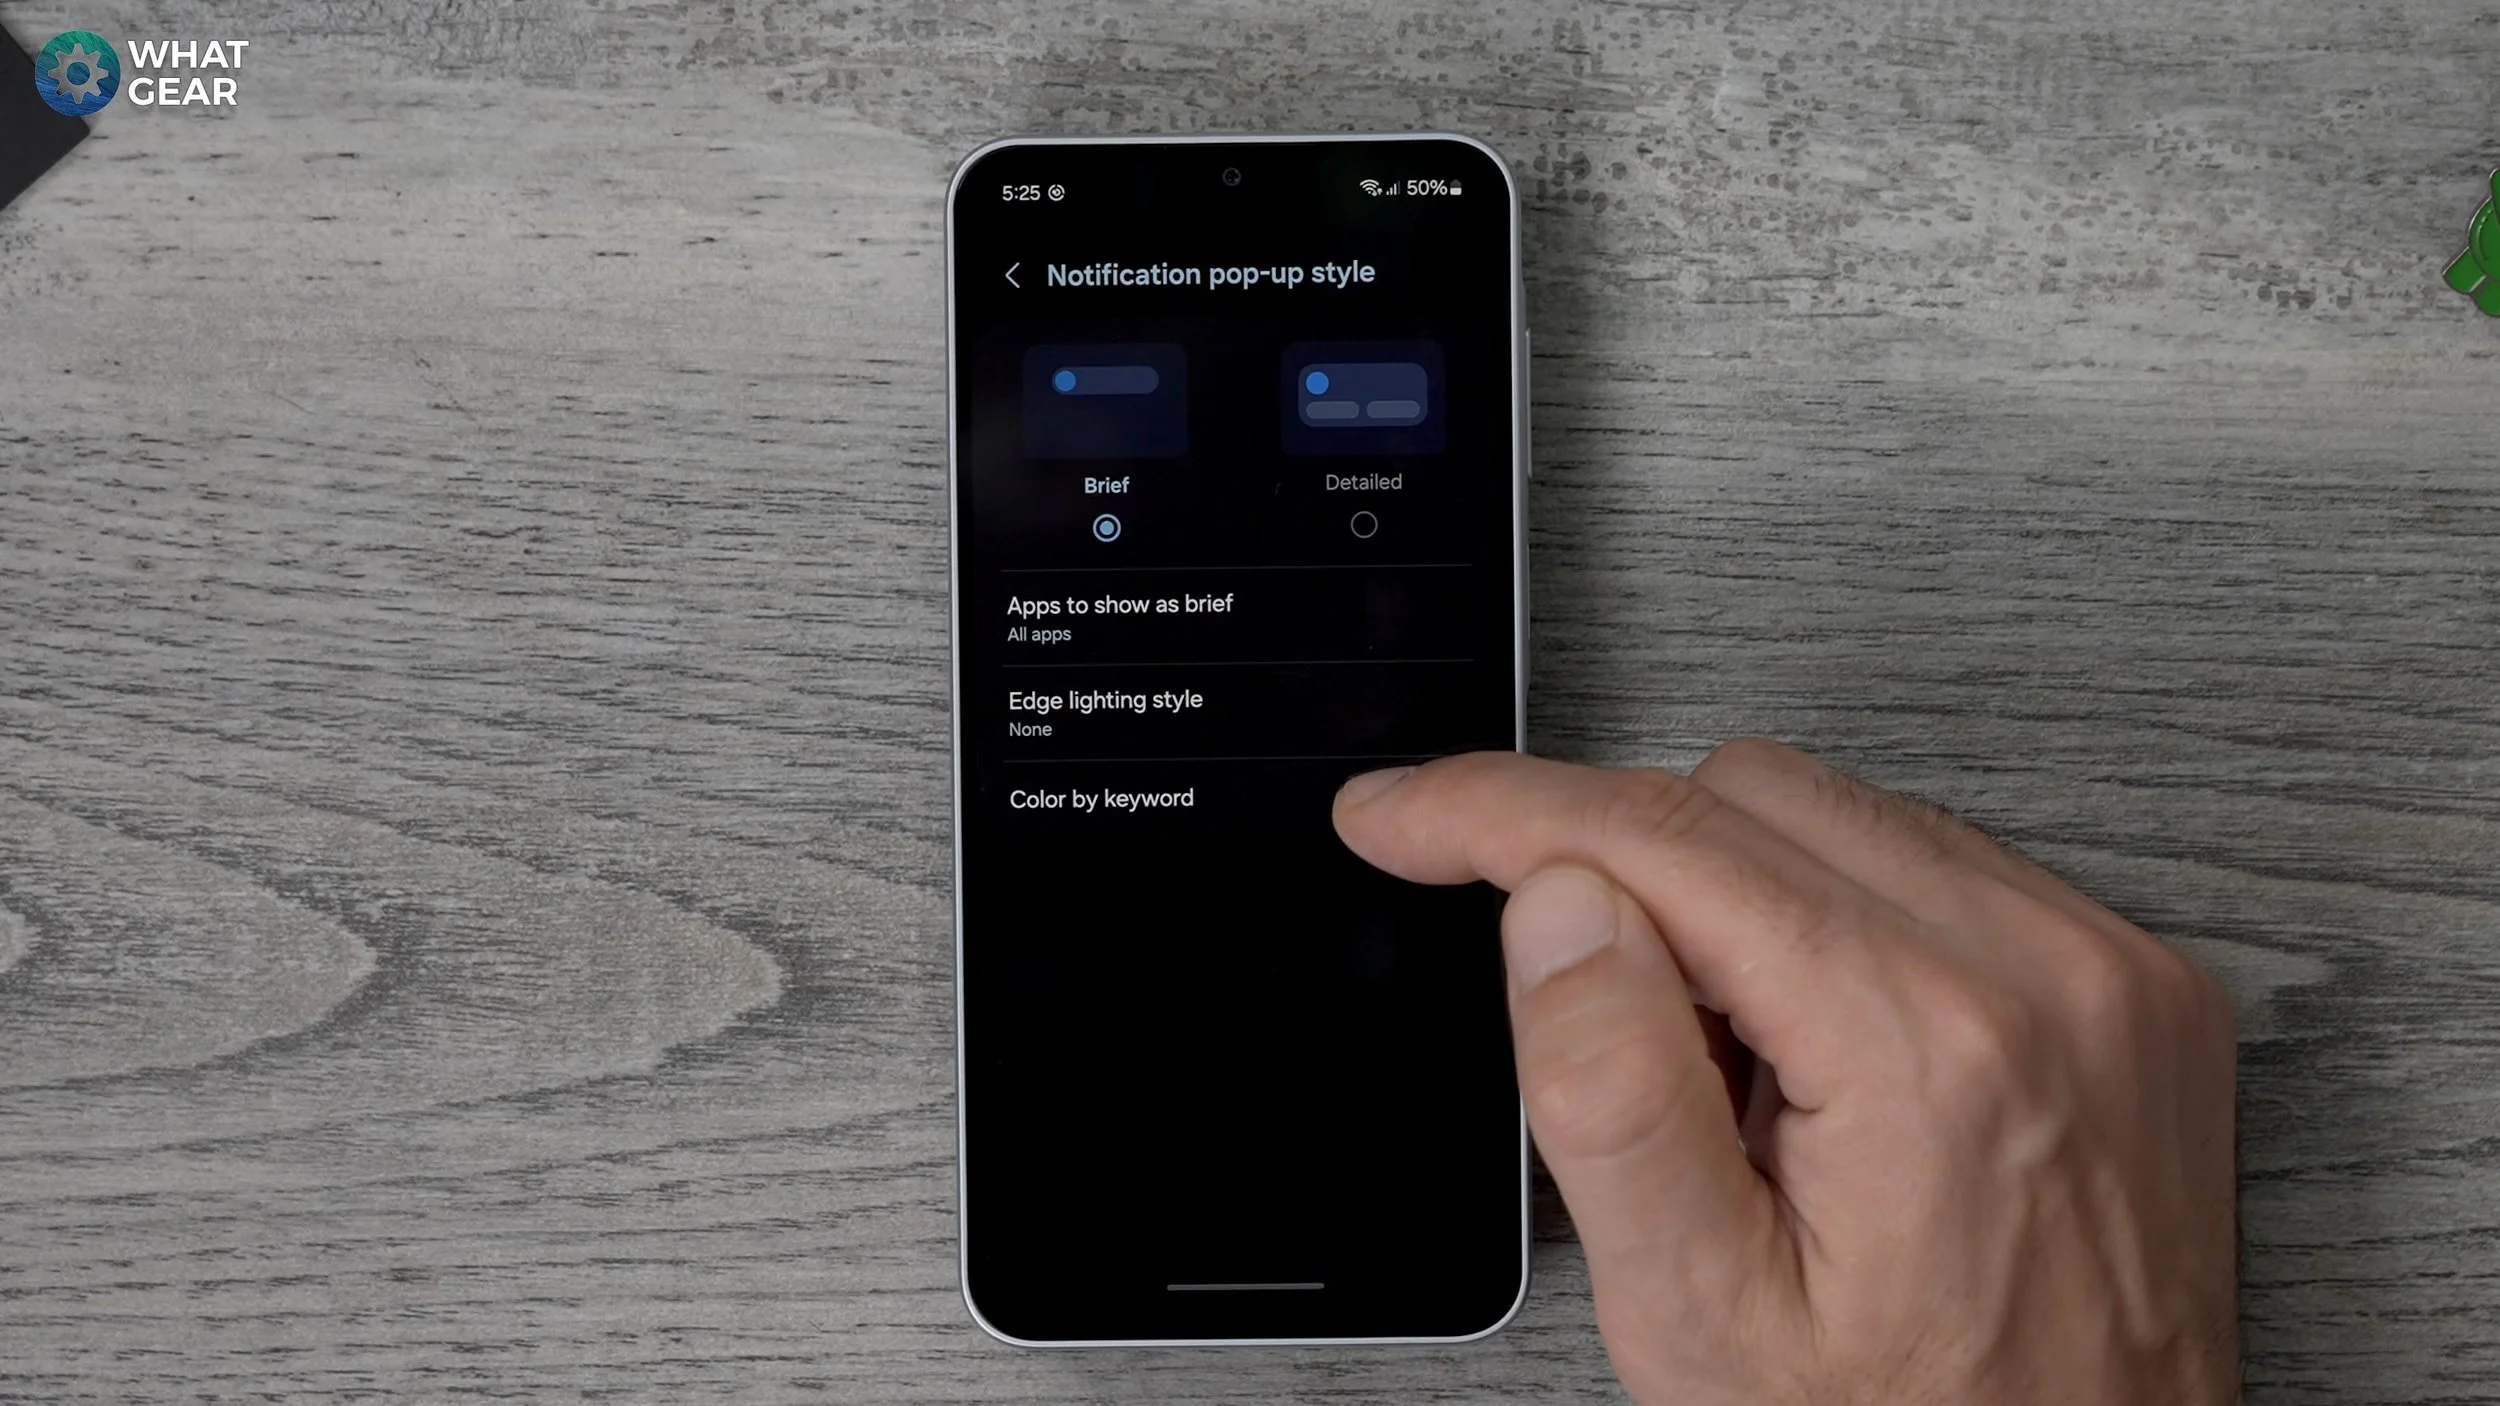
So this next little customization tweak is very, very useful. So if you jump into your settings again go to notifications. Go to the notification pop up style. And here you will see color by keyword. So what you can do here is actually type in the names of your friends and family as they appear in your phonebook. So I'm just gonna put my own name, hit the plus, and then you can choose a custom color for that person.
So let's go with a purple. Now when the notifications come through, they'll actually be the color that you've chosen. And if we go back you can go to the edge lighting styles and customize how the notifications appear so you can have it so glow at the top. This is my favorite one, but there's a bunch of different options here.
So this will allow you to identify what kind of notification it is instantly without even having to read the notification itself, and it will match the color that you've chosen. But if you want, you can set your own manual colors here as well, and you can adjust the transparency and the duration of the animation as well. So you can play around with this.
Hidden Screensaver
Okay, so remember how I said adding the Google clock unlocks another feature on the phone? Well, this is something that I really, really appreciate. So check this out. Go into your settings, scroll down to display. Scroll down again, and right at the bottom of the list you'll see screensaver. So right now is off. What I like to do is set up the clock.
So when the phone's charging at night or it's on the bedside table, it actually displays the Google Clock in this kind of faint text. And if you actually go to the settings on this, you can change it to the same style as the one on the home screen. And you can also enable the night mode.
So very dim for dark rooms if you want to. And if you hit preview you will see how it looks. So this is definitely my preferred night clock. And you will notice this sort of refreshes where it is on the screen over time.
Custom Shortcuts
Now let me show you a couple of really useful and powerful shortcuts that can allow you to activate certain features on the phone without having to jump into any of the settings.
So if you go to settings here, scroll down to accessibility. And within the accessibility options you want to go to Advanced Settings. Now here you can remap this icon, volume up and also volume up and down at the same time to do different things. So so let's do second volume up button first. Let's say sometimes at night you're watching videos in bed and it's blinding your eyes.You could actually set this up to activate the extra dim feature.
So this will reduce the brightness of the screen significantly just by hitting the power button and volume up. So now have a look at the options available here. I set up the one that makes the most sense to you. Then also the same thing applies for the volume up and volume down at the same time.
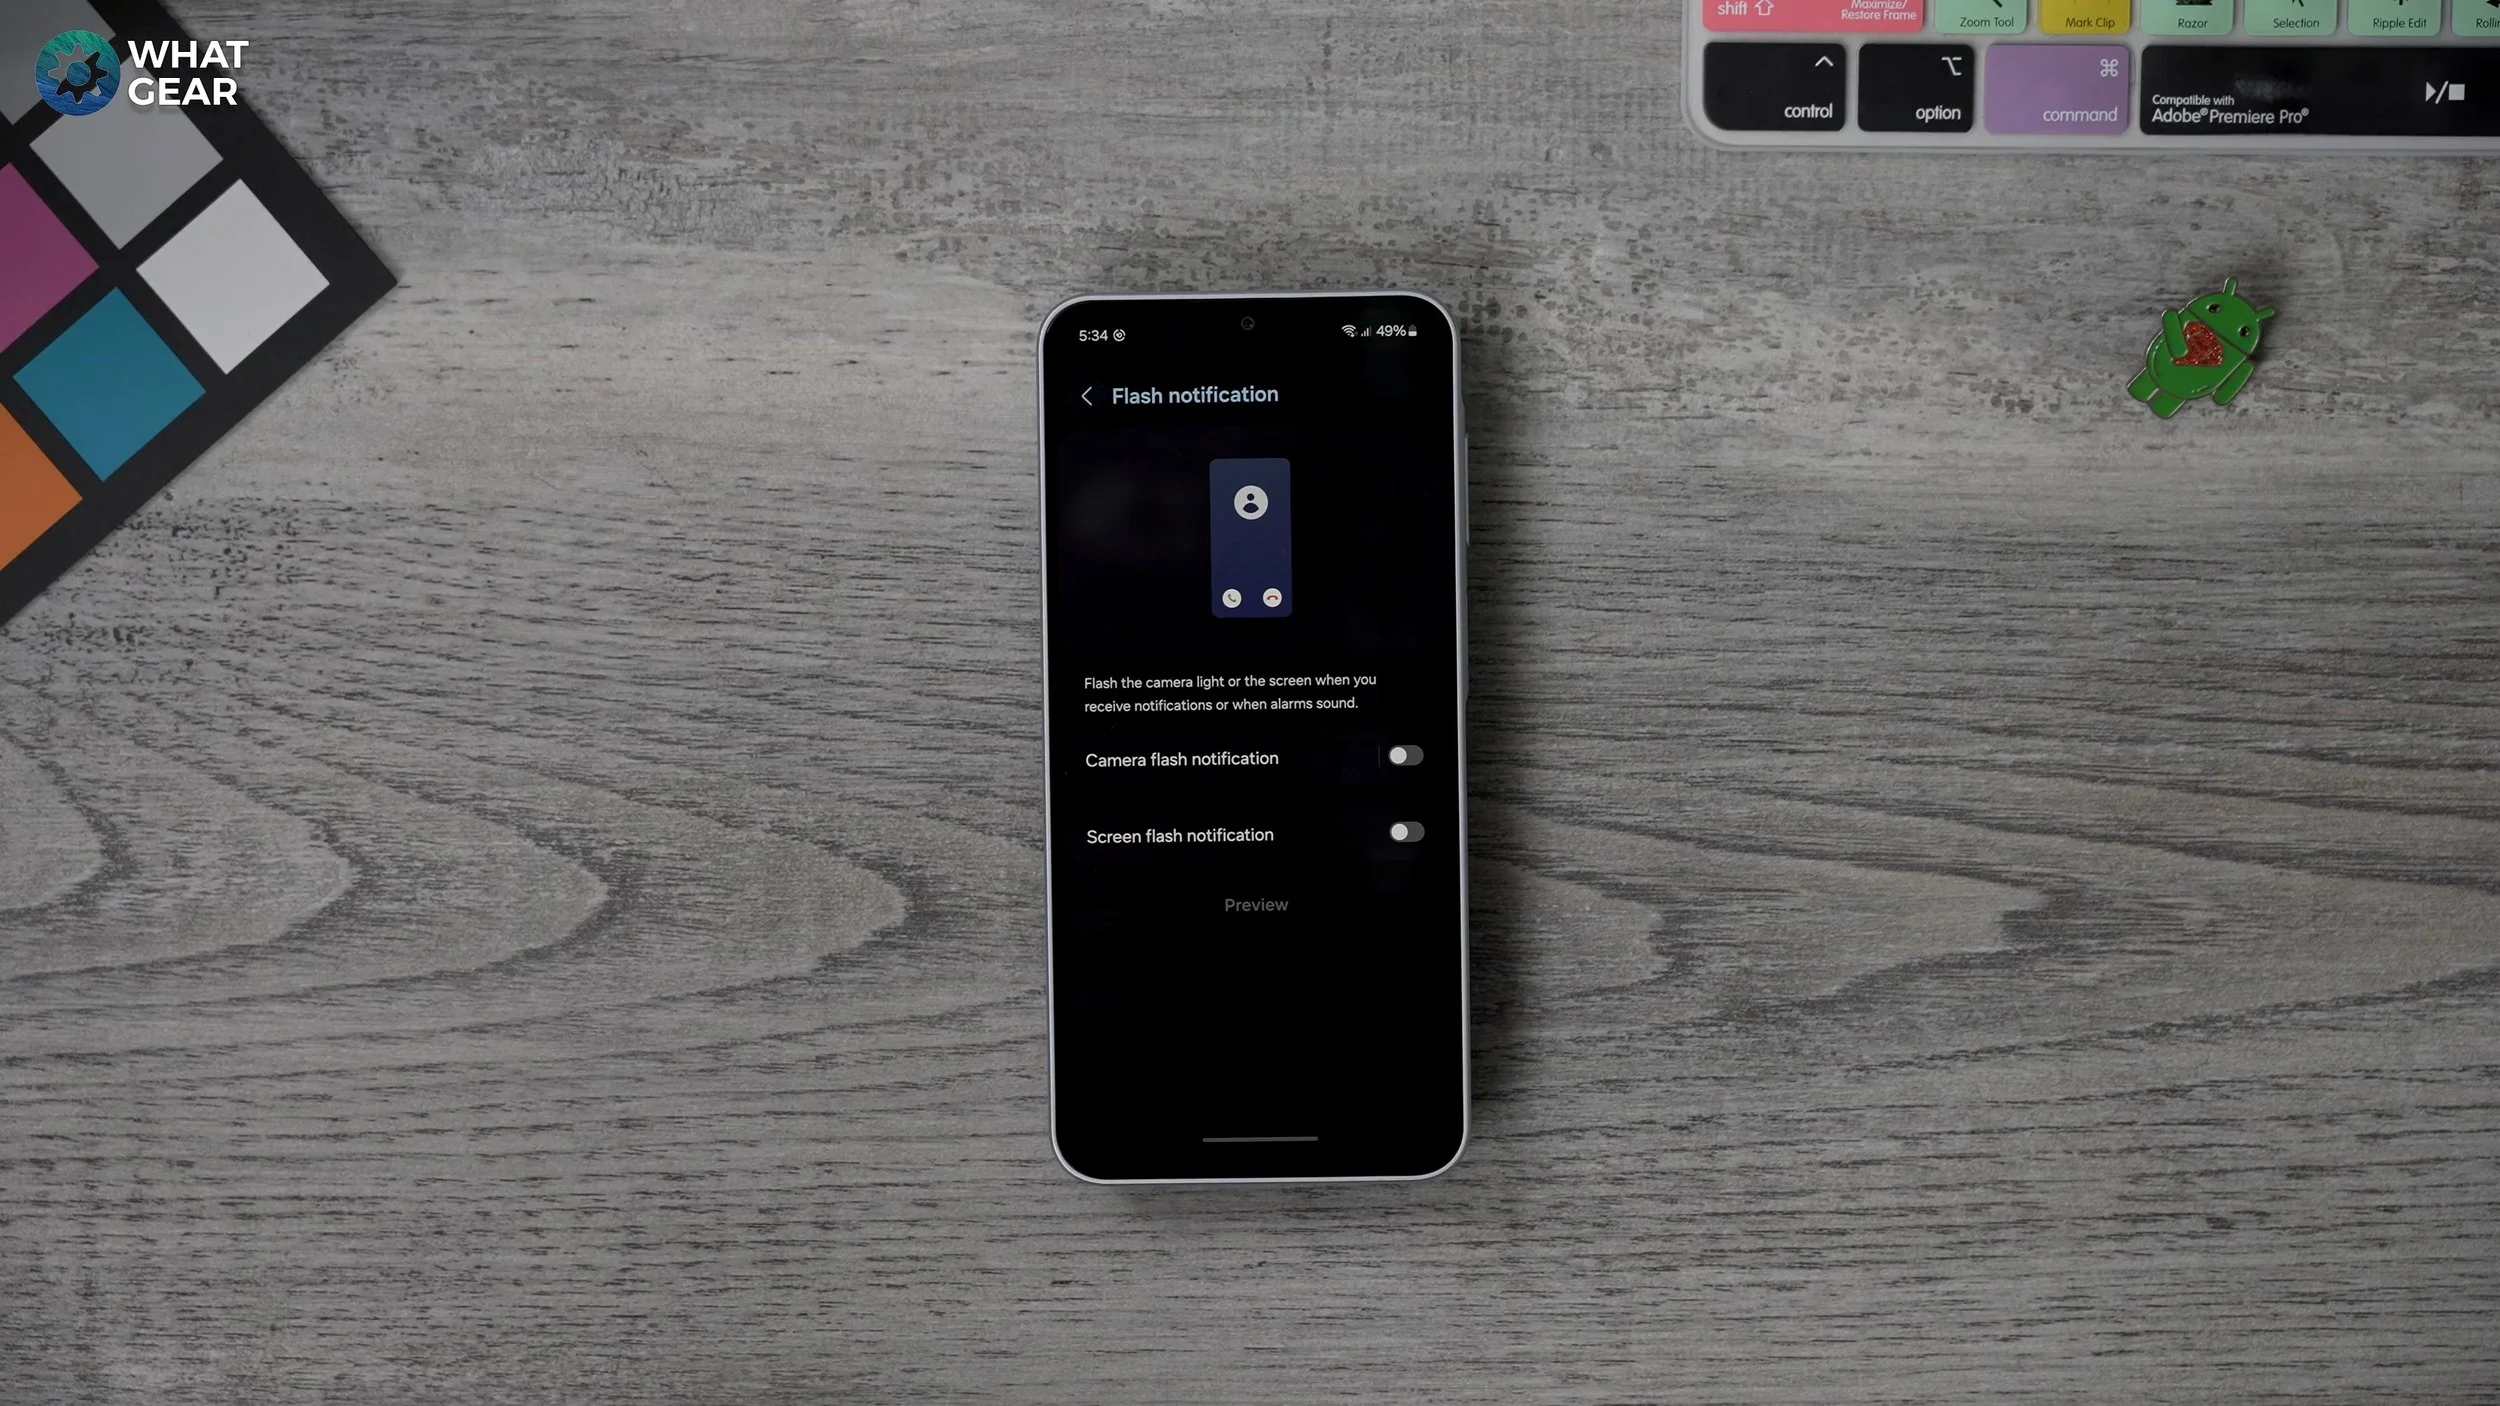
And while we're here, there is a little bonus one the flash notifications. So if you're hearing isn't as good as it used to be, you can actually use the camera flash to blink when you receive a phone call or something like that.
Add AI
All right, so going into 2025 AI is set to take over. And this phone, although it doesn't have any native AI, there's nothing to stop you making the most of Google's Gemini.
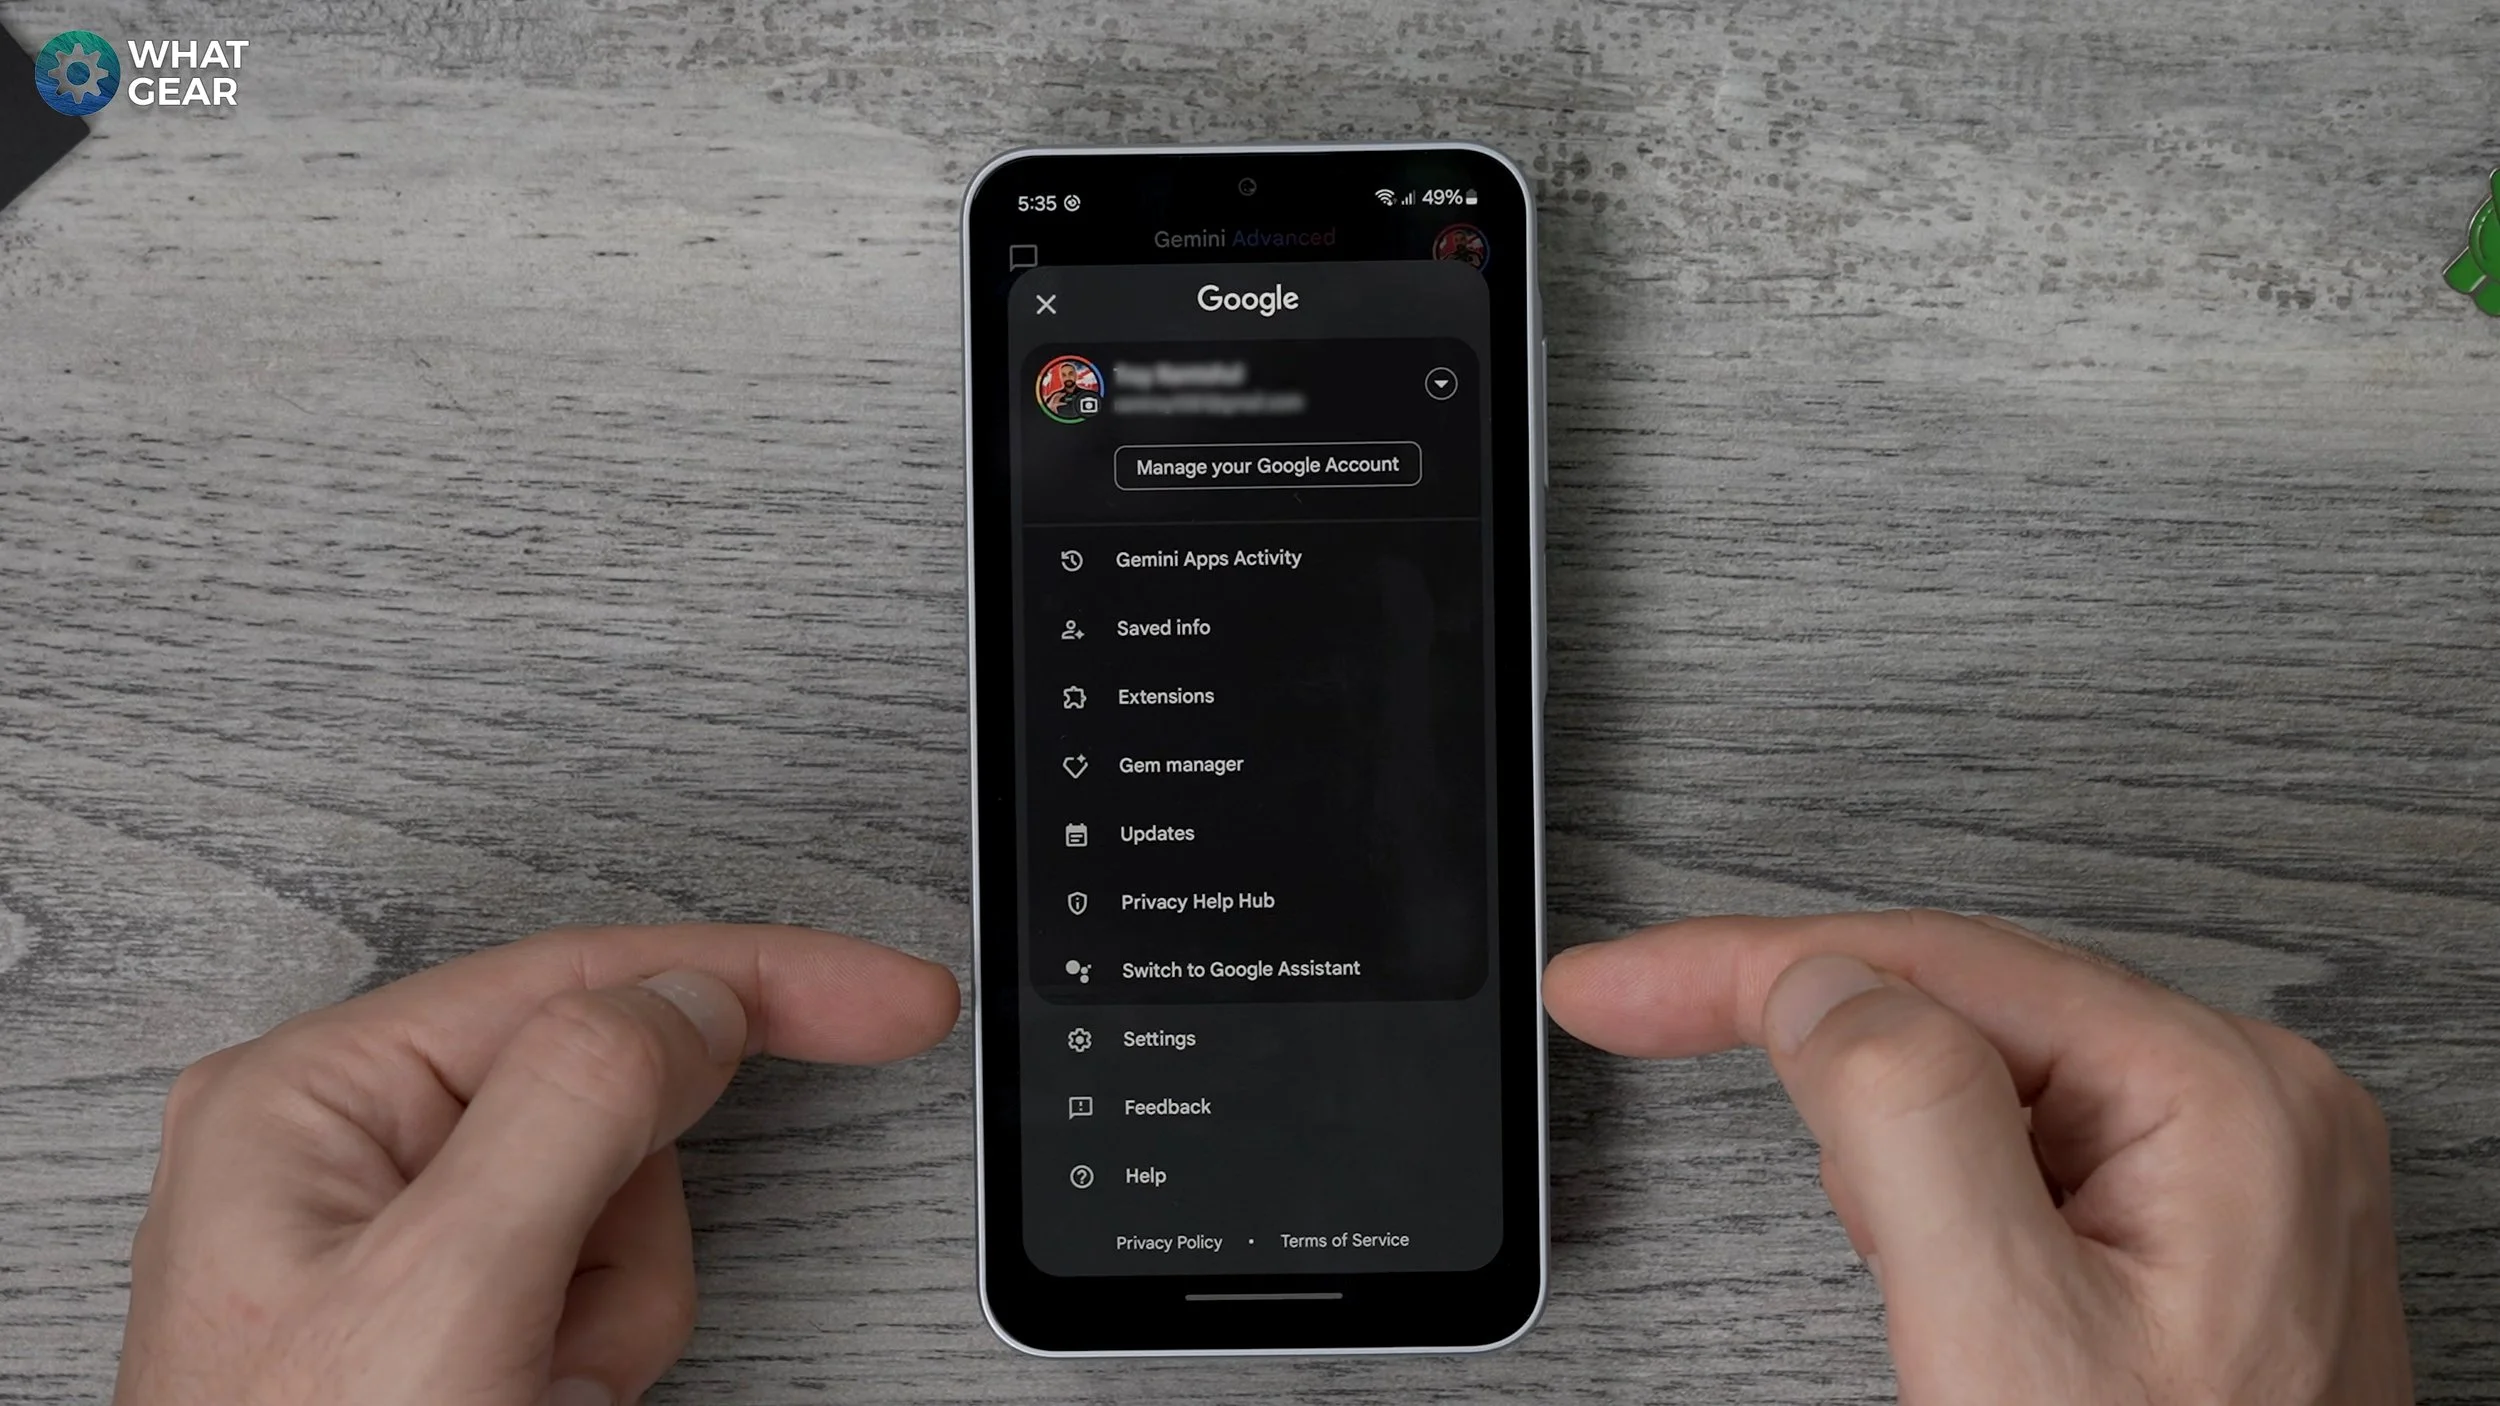
I do recommend you set this up on day one because it's super powerful. So to get this up and running on your phone, just go to the Google Play Store, type in Gemini, install this. Now the first time that you install this. You'll see the option here to switch the Google Assistant to Gemini with this enabled. Now, this search bar here will use Gemini's AI to assist you as well as the Google Assistant.
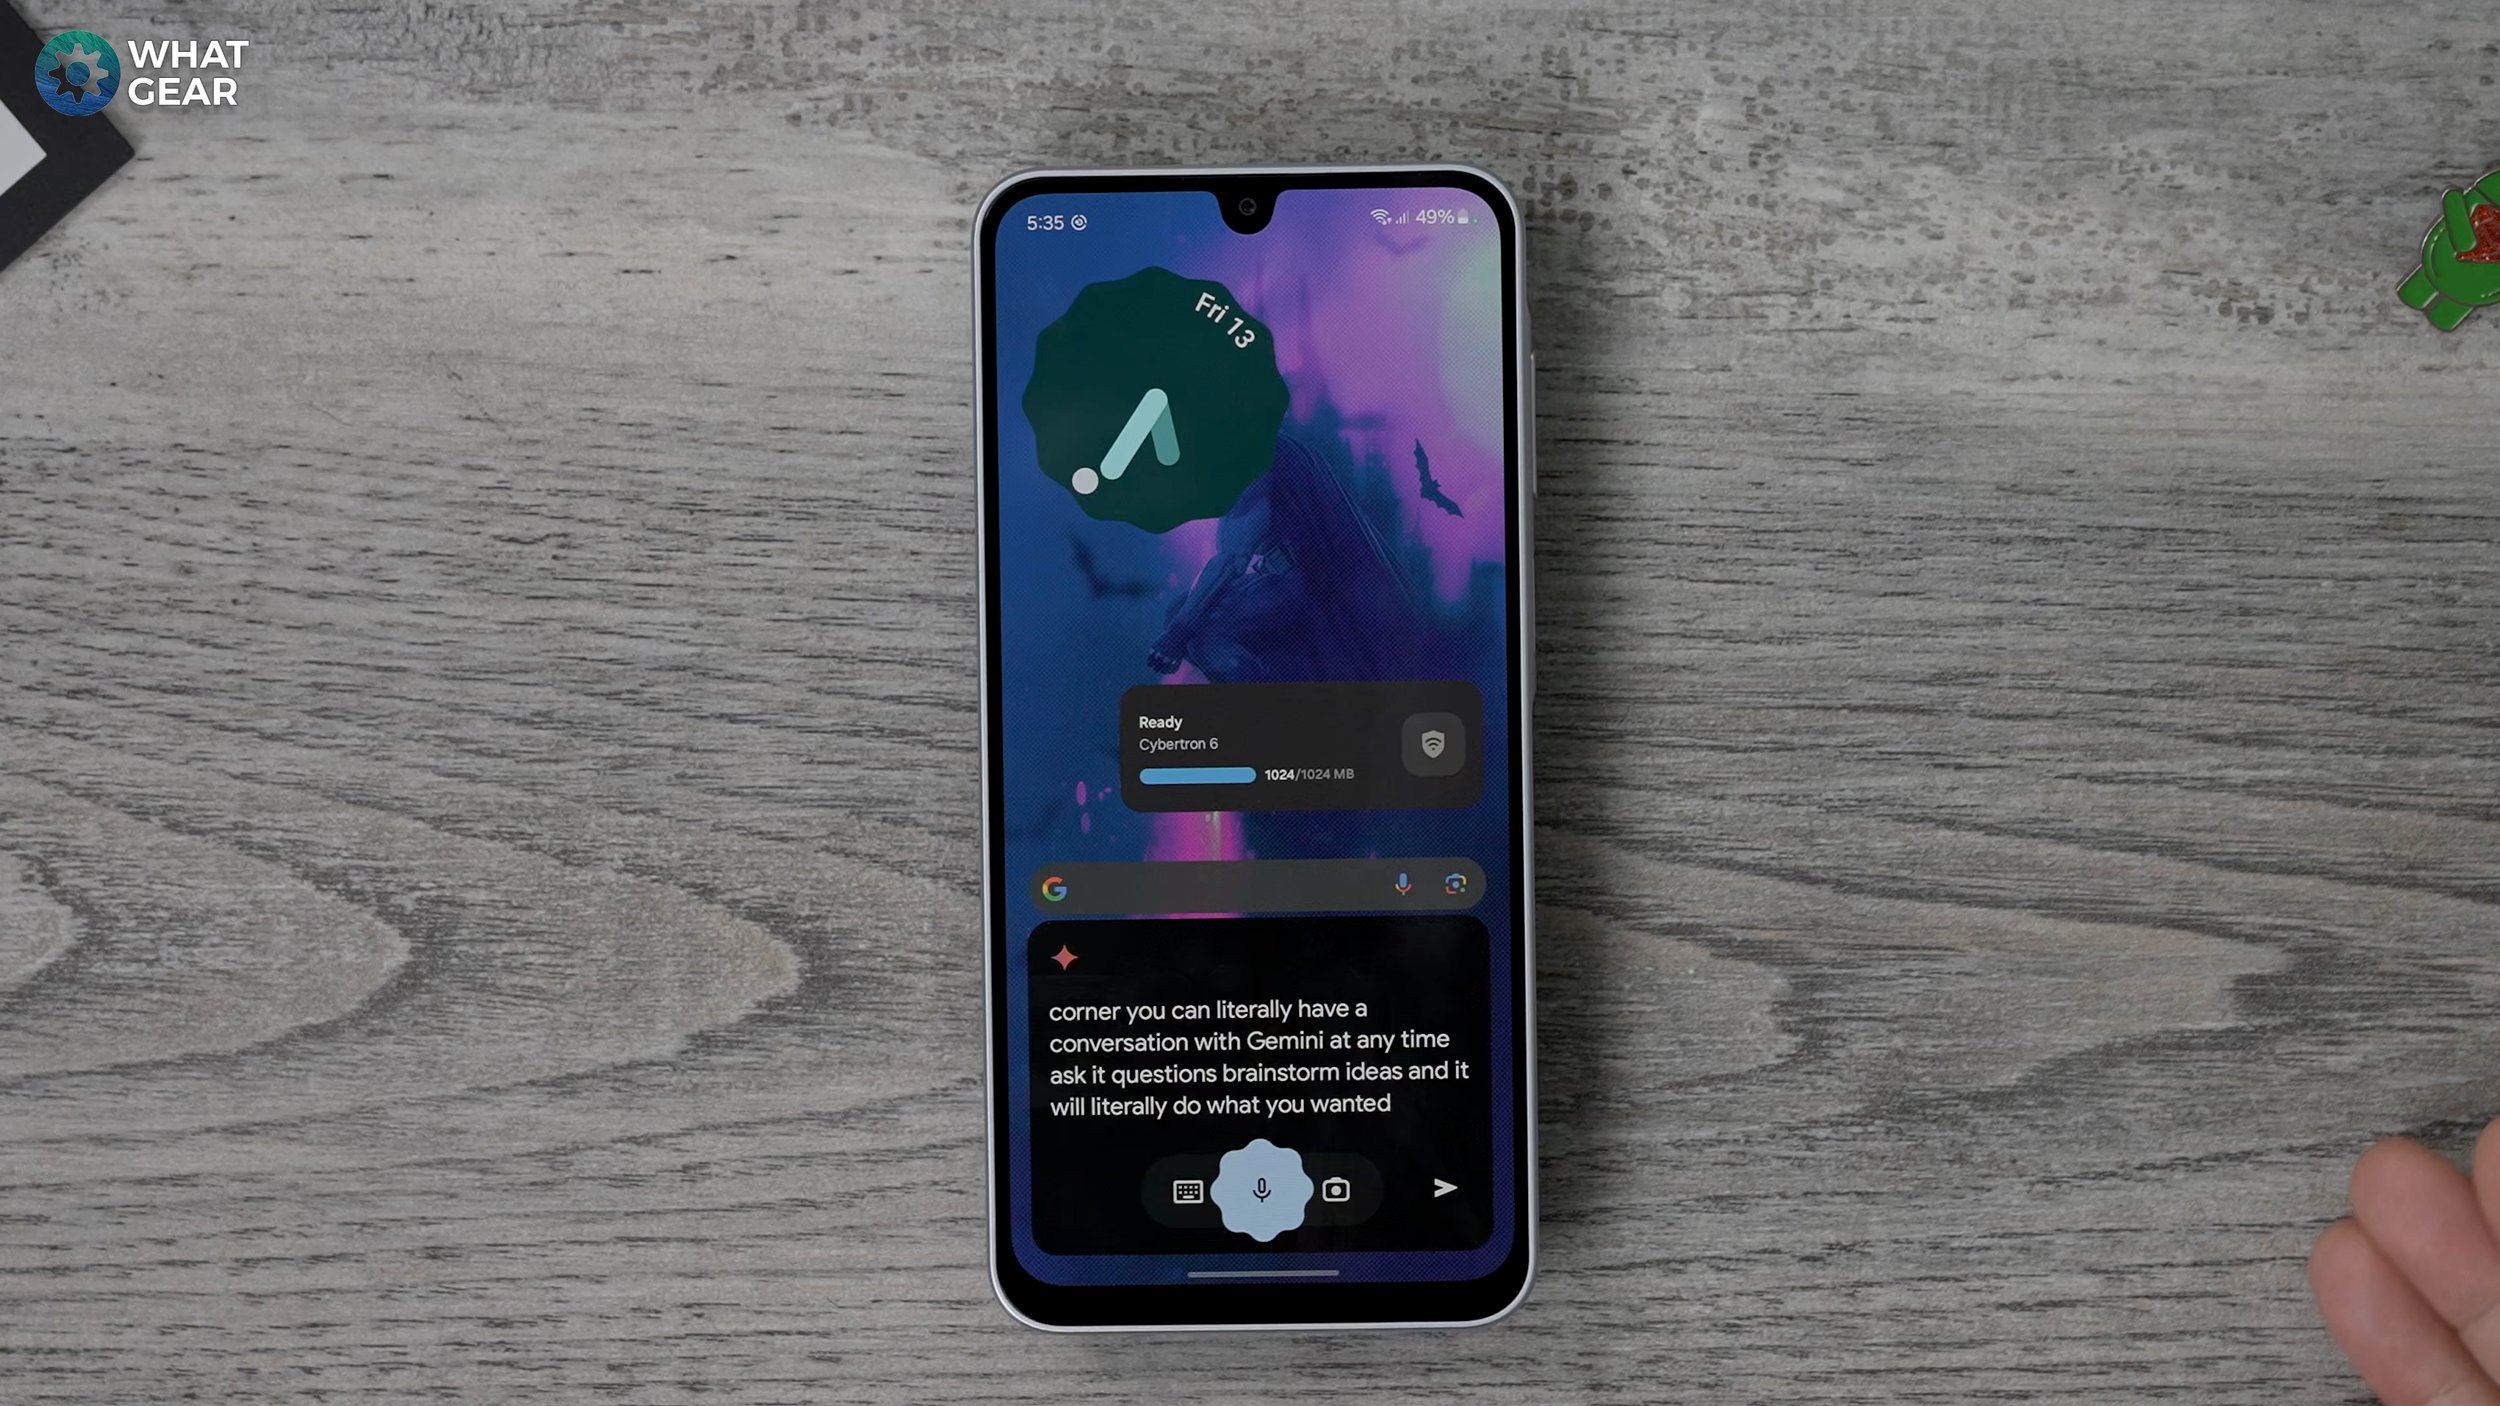
But if you want to use Gemini on its own without a Google Assistant, if you swipe up diagonally from the bottom right corner, you can literally have a conversation with Gemini at any time. Ask it questions, brainstorm ideas, and it will literally do what you want it to do.
Absolutely! Gemini is ready for a chat, brainstorming session, or tackling tasks whenever you are, and this is super useful because it's Google is like searching Google for the answer, except it does it all for you. So definitely set this up on day one and unlock the power of Gemini on your Galaxy A16.
Theft Protection
All right, so from time to time, people's phones get stolen and if you don't want that to happen to you, you might want to do this. Jump into your settings. Go to Security and Privacy. Go to more security settings and select this Theft Protection.
So this is a new feature from Google that can actually detect if your phone has been swiped out of your hand and is moving very quickly away from you. So enable this. That way it kind of protects the device straight away and locks it so they can't access all of the stuff that's on it. You can also activate offline device lock and the find and erase feature.
Contingency
Now another very important security tip is this. So Google have their own security features but also Samsung have this. So if you go into the Samsung folder in your app drawer you'll see Samsung's find.
So I do recommend you set this up on your phone on day one because it could come in handy later.
The Most Important Step
Now listen, if anything that I've showed you in this video isn't appearing on your phone how it is of mine. And that's probably because you haven't done maybe the most important thing to do on day one with the Galaxy A16. So there are three steps. It is number one is to go to the Play Store, hit your little icon in the top right corner and in here where it says Manage Apps and Voice.
It will automatically scan for updates. Now the first time you get this phone, it will probably have like 20 or 30 of these to do straight away. And a lot of these are system updates from Google, and they massively affect all of the features on the phone. So if you haven't done this, do it now. Now the next step is just as important as the Play Store is the Samsung Galaxy store, which is this one here.
Go into that and if there are updates, do all of them because these again are system updates specifically for Samsung phones. And they will improve the software on the phone and unlock new features. So if you haven't done this make sure you do this. And maybe from time to time come back and check that you do have the latest versions of all of Samsung's stuff.
Now, the third step is arguably the most important when it comes to making sure your phone is running at its optimal speed. Go to your settings, go to Software Update, and just make sure that you do have the latest version of one UI running on your phone, not only for security reasons, but also for performance reasons. And a lot of times when you get a new update, there will be a ton of new features to play around with on your device as well. So definitely make sure you've done this.
Power User
So hopefully by this point your phone is starting to take shape a bit more and I have saved a bonus tip for you. And this is very much a power user tip, so check this out. If you go into your settings, go to display. Scroll down until you see this edge panels.
Switch this on. What this does is it gives you a set of apps which you can configure here at the edge of the screen. So when you swipe this out, these are the default apps. Now if you want to customize these just hit the pen bottom right corner. Delete the less useful ones. Add the ones that will be most useful to you.
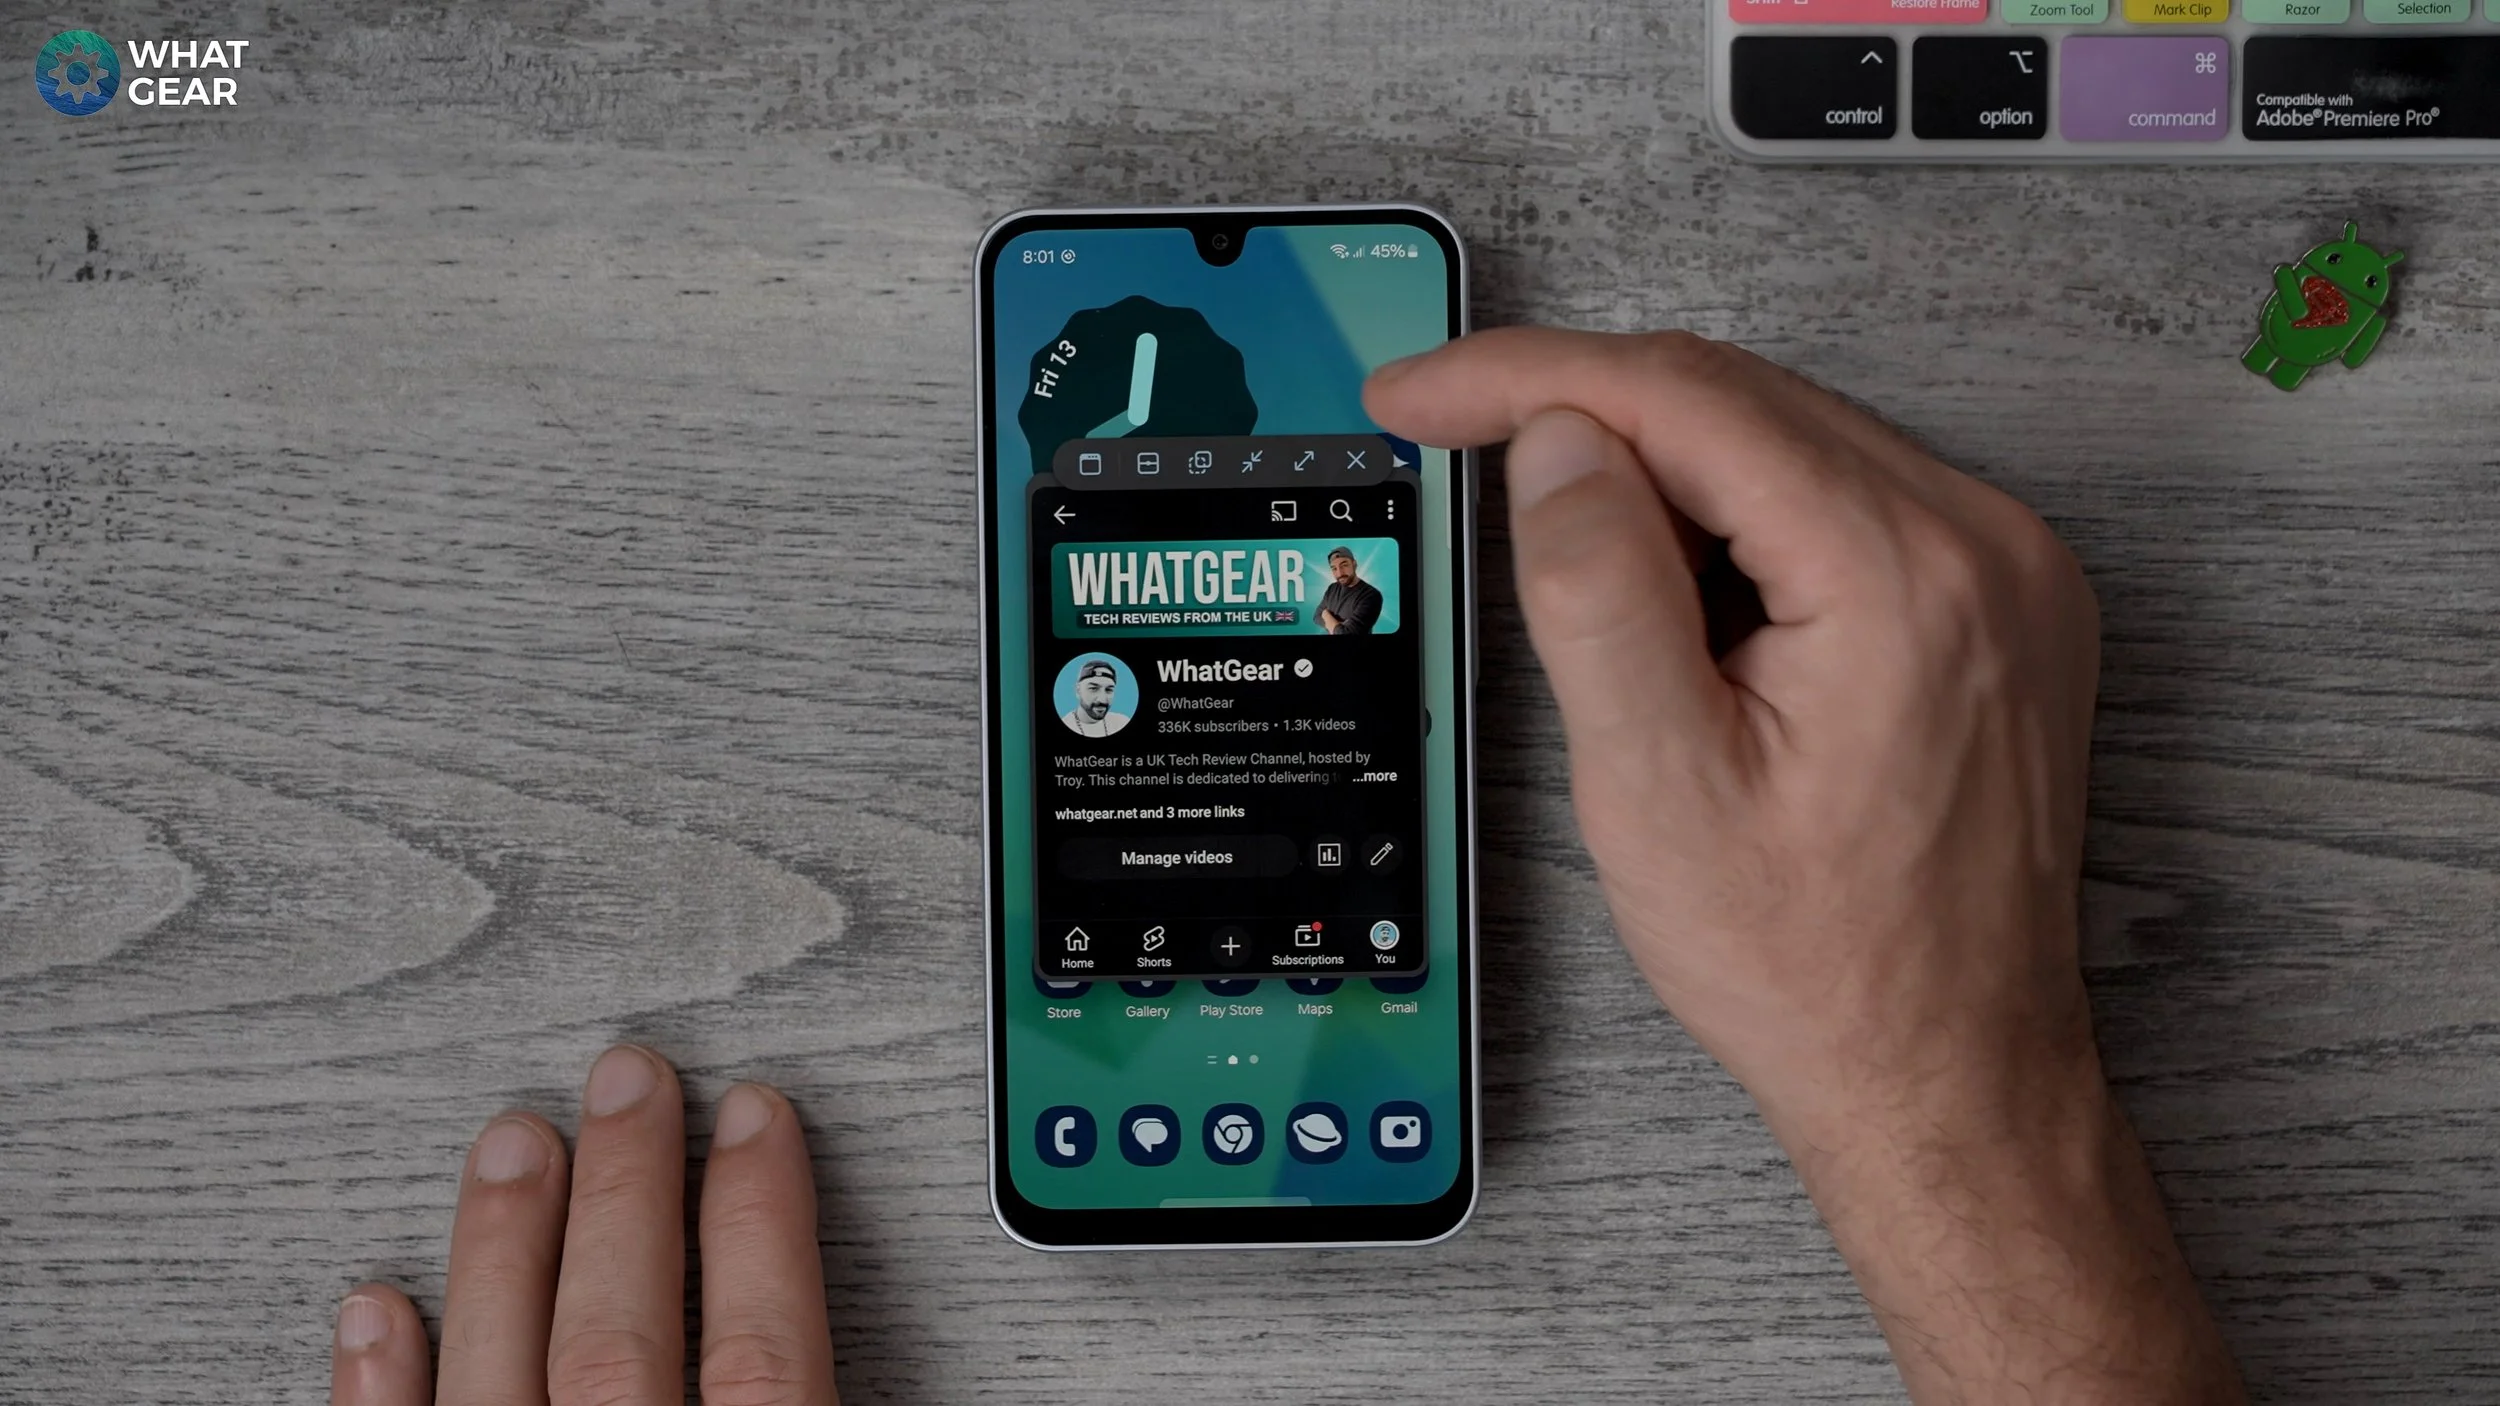
And swipe back. And now they're set up. Now the edge panels have some great use cases, but the most powerful one of all is the ability to do split screening very easily, also creating floating windows very easily.
So for example, if we swipe out the edge panel and I want YouTube to be on the top half of the screen, you can drag it up bottom half of the screen, I can drag it down.
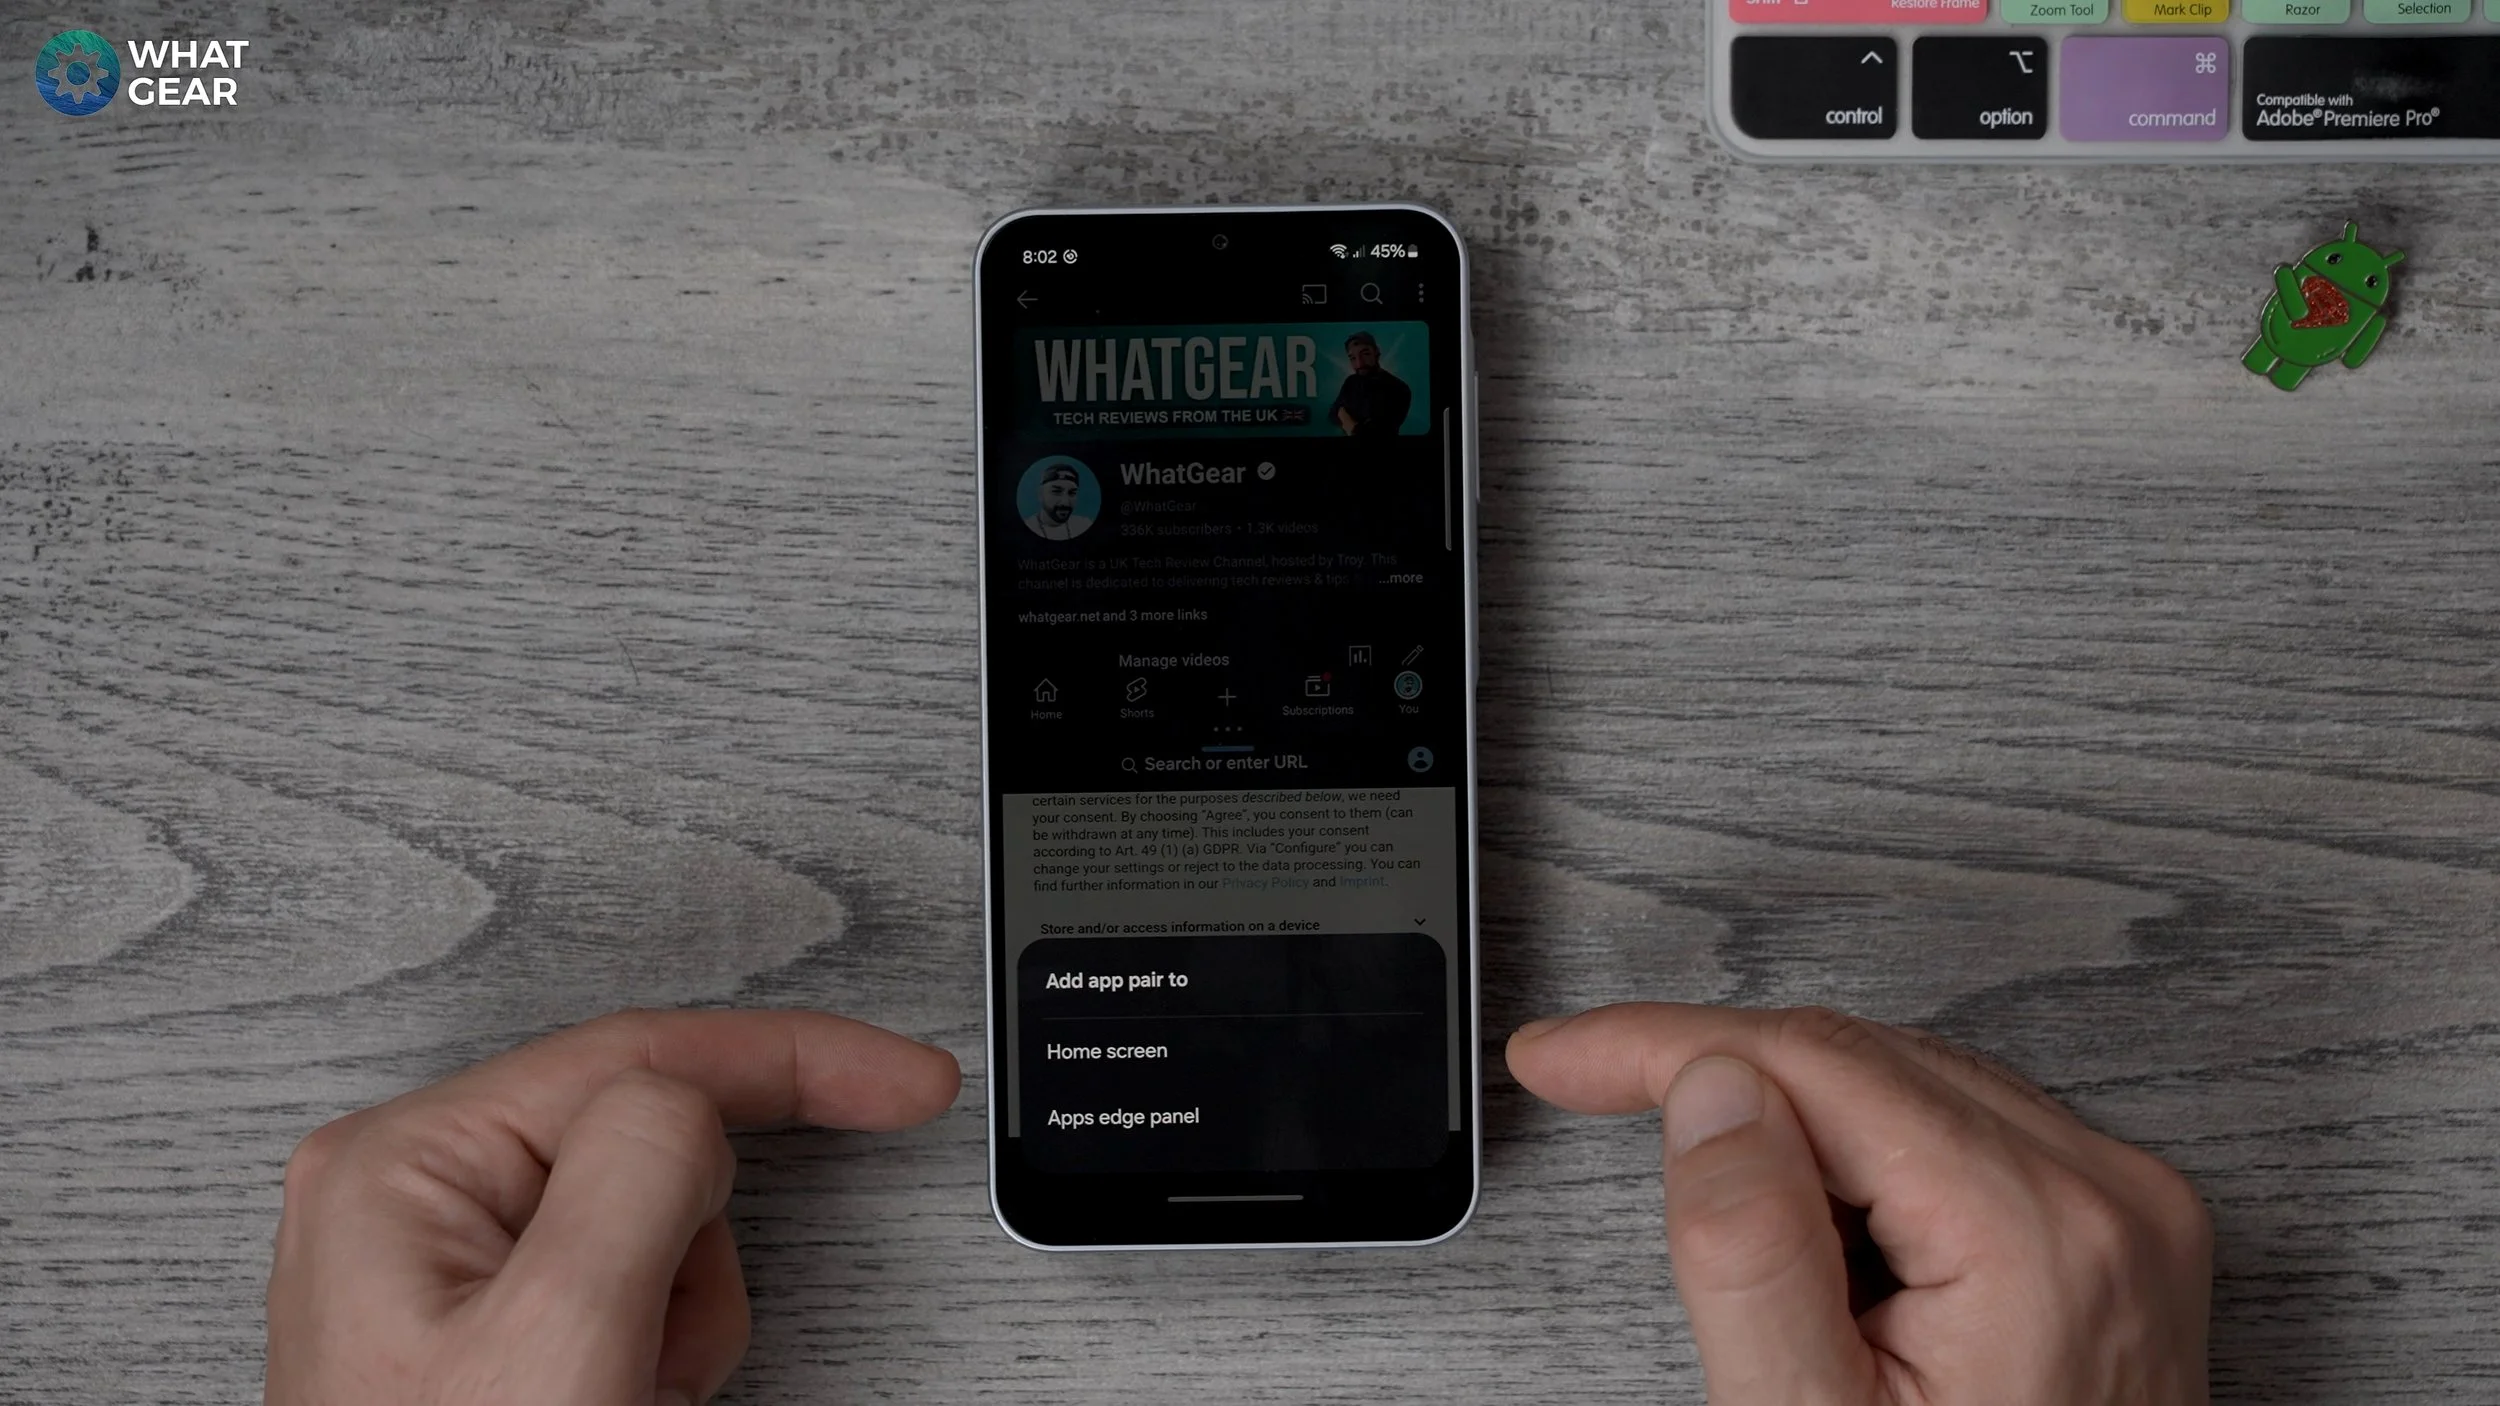
If I drag it to the middle, it will be a floating window. So that's the basics of how to do that stuff. But check this out. There is another very useful use case here. So let's say I want you to top half and I want Samsung Internet bottom half. I'm gonna drag it there. Now we have our app pair set up.
And if you hit the three dots in the middle right here right to center, you will see the star. So you can hit that star and then adds it either to the home screen or to the edge panel. So you can configure nice little app pairs and save them to the edge. So next time I want YouTube and web browser together, I can drag that out.
Just tap the shortcut and it creates it straight away. So I think about app pairs that could be useful for example maybe a notepad and a website. When you researching or maybe a calculator and a spreadsheet, these kind of things could be super useful with the edge panels. And you can actually add more edge panels if you want.
And this is how you do that. You just swipe it out, hit the little settings in the bottom left corner, and then there are other edge panels that you can add, for example a compass. Now that that's been added, when I swipe out the edge panel and swipe again, I have access to that compass. So it's a pretty powerful tool.
Hidden Mini Game
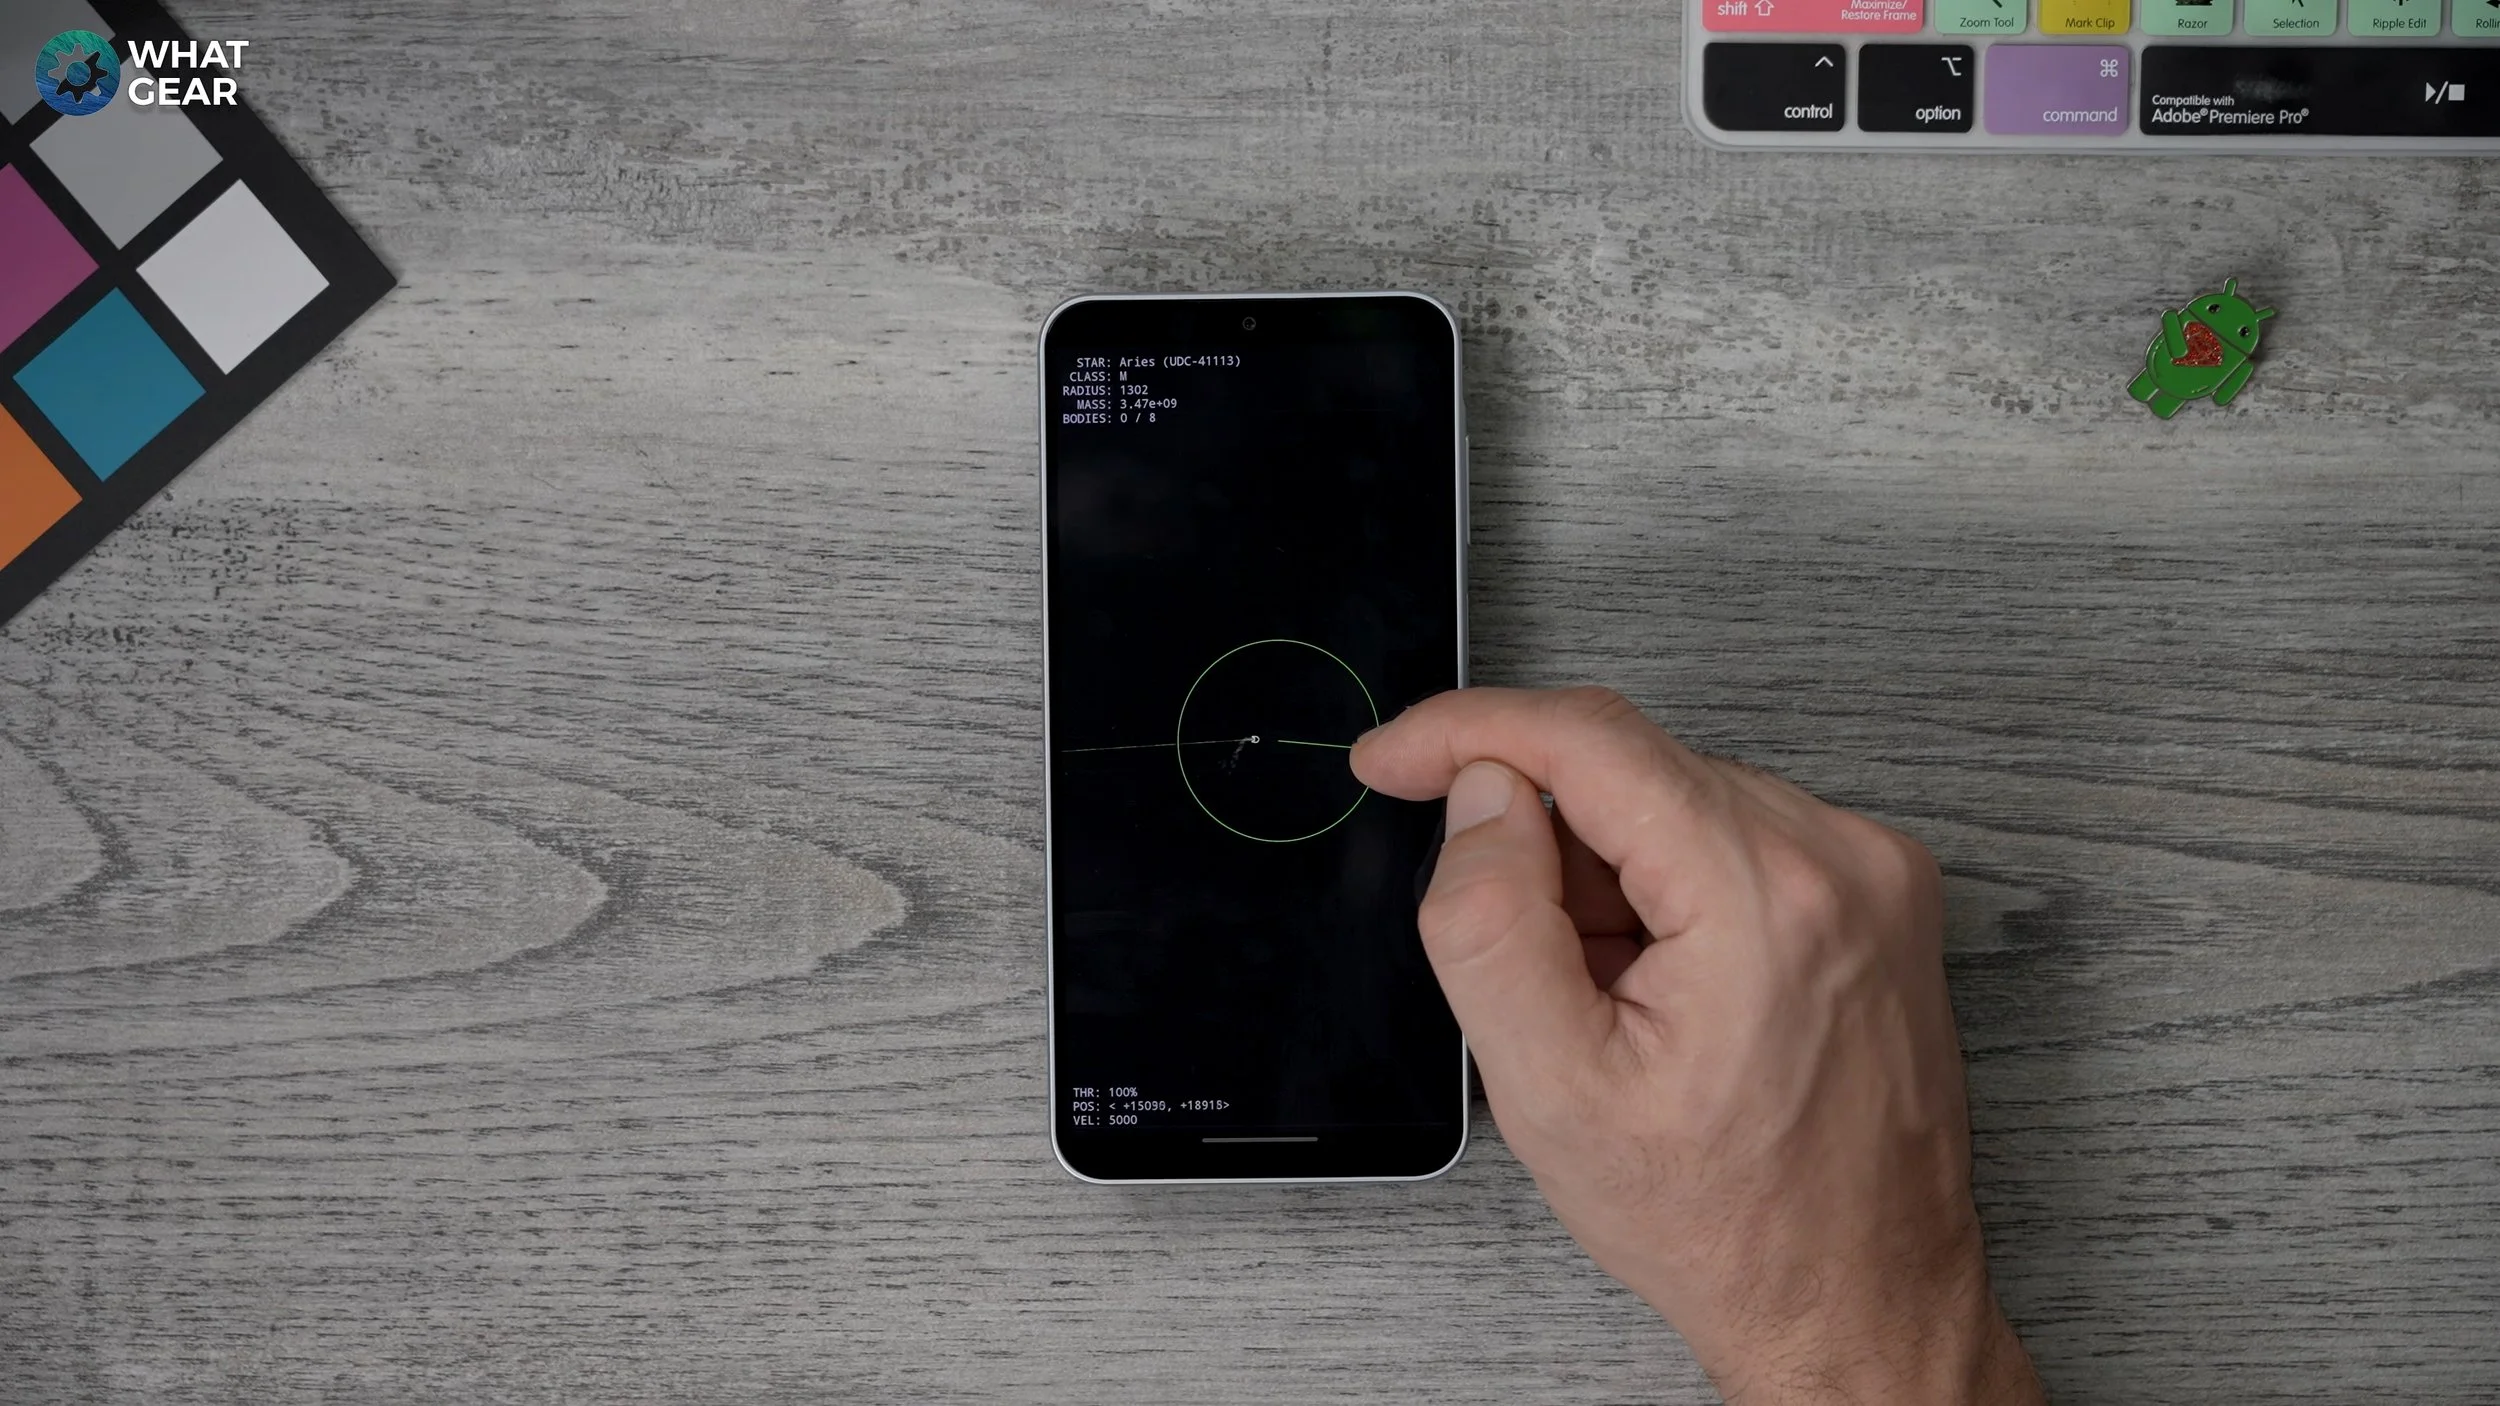
Here's a little bonus. Hidden game within the software on the Galaxy A16. If you go into the settings scroll all the way down to about phone, go to Software Information and tap on the Android version continuously until it opens up the Android 14 game.So this game is very difficult. You fly a little spaceship around and you have to look for planets to land on, and yeah, that's pretty much it.
It can take quite a while, but if you've got some time to kill, this can be great fun, but very challenging. So there we go, guys. That's more than 20 tips and tricks for the Galaxy A16.
This is kind of a beginner's guide. If you want to learn more about what Samsung phones can do, there are a couple of thumbnails on screen right now. Go check those out and if you did find this video valuable, leave me a comment. And if you just subscribed, you're now one of the finest subscribers known to man, and I will see you in the next one.


